自作アプリケーションで表示フォントを変えたい場合があります。
今回はWindowsで使えるフォントをすべて取得し、コンボボックスやリストボックスでフォントを選択する方法を解説したいと思います。
今回紹介する画面の動作
サンプルプログラムはWPFで作成していますが、フォントの取得部分はWindowsFormと共通です。
WindowsFormの場合、コンボボックスやリストボックスで実際のフォントを表示すること自身が難しいのですが、WPFであればXAMLで簡単に実現できます。
C#のソースコード
コンボボックスにせよリストボックスにせよ、C#側のソースコードは全く同じです。
GetFontList() でフォント一覧を取得し、フォームのDataContextにセットした後は、XAML側のBind機能を使ってコンボボックスやリストボックスにフォント名を表示しています。
フォント一覧は FontsクラスのSystemFontFamiliesコレクションを参照することで取得可能ですが、このままでは日本語フォント名が正しく表示されません。
そこで、カレント言語(OSの言語)のフォント名を取得し、日本語フォント名が見つかった場合は、それを使うようにしています。
取得したFonts.SystemFontFamiliesのフォント名を日本語に書き換えたいところなのですが、このメソッドは参照のみなので、別途MyFontというクラスを用意し、LocalFontName プロパティにフォント名をセットするようにしています。
using System;
using System.Collections.Generic;
using System.Linq;
using System.Text;
using System.Threading.Tasks;
using System.Windows;
using System.Windows.Controls;
using System.Windows.Data;
using System.Windows.Documents;
using System.Windows.Input;
using System.Windows.Media;
using System.Windows.Media.Imaging;
using System.Windows.Navigation;
using System.Windows.Shapes;
using System.Windows.Markup;
using System.Threading;

namespace FontSelectTest
{
    /// <summary>
    /// MainWindow.xaml の相互作用ロジック
    /// </summary>
    public partial class MainWindow : Window
    {
        public MainWindow()
        {
            InitializeComponent();


            //取得したフォント一覧をフォームのDataContextにセット

            DataContext = GetFontList();
        }


        /// <summary>
        /// すべてのフォントを取得するメソッド
        /// </summary>
        /// <returns></returns>
        private MyFont[] GetFontList()
        {
            //カレントの言語を取得
            this.Language = XmlLanguage.GetLanguage(Thread.CurrentThread.CurrentCulture.Name);
            //すべてのフォントを取得し、MyFontクラスの配列にする
            var fonts = Fonts.SystemFontFamilies.Select(i => new MyFont() { FontFamily = i, LocalFontName = i.Source }).ToArray();
            //フォント名がカレント言語に存在したらカレント言語(つまり日本語)を、
            //存在しなければ英語表記のフォント名を LocalFontNameにセットする。

            fonts.Select(i => i.LocalFontName = i.FontFamily.FamilyNames
                .FirstOrDefault(j => j.Key == this.Language).Value ?? i.FontFamily.Source).ToArray();

            return fonts;
        }
    }

    /// <summary>
    /// フォント情報を保持するクラス
    /// </summary>
    public class MyFont
    {
        public FontFamily FontFamily { get; set; }  //フォントファミリー
        public string LocalFontName { get; set; }   //フォント名
    }

}
フォントを格納したMyFontクラスの配列をDataContextに渡していますが、代わりにコンボボックスまたはリストボックスのDataContextに直接セットすることも可能です。
ただし、その場合は、コントロールに名前を付ける必要があります。
例えば、 コンボボックスに uxFontSelect という名前を付けた場合、次のように記述します。
uxFontSelect.DataContext = GetFontList();また、冒頭の参照設定には以下の2行が必要になります。
using System.Windows.Markup;
using System.Threading;
XAML(コンボボックス)
コンボボックスでフォントを選択する場合は次のようになります。
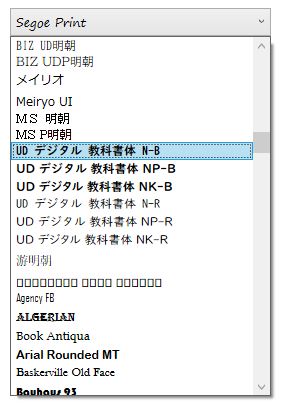
ComboBoxのDataTemplateにTextBlock を配置し、フォント名を該当するフォントを使って表示します。
<Window x:Class="FontSelectTest.MainWindow"
        xmlns="http://schemas.microsoft.com/winfx/2006/xaml/presentation"
        xmlns:x="http://schemas.microsoft.com/winfx/2006/xaml"
        xmlns:d="http://schemas.microsoft.com/expression/blend/2008"
        xmlns:mc="http://schemas.openxmlformats.org/markup-compatibility/2006"
        xmlns:local="clr-namespace:FontSelectTest"
        mc:Ignorable="d"
        Title="MainWindow" Height="290.164" Width="572.541">
    <Grid>
        <ComboBox Width="261" Height="28" Margin="34,28,0,0" HorizontalAlignment="Left" ItemsSource="{Binding}" VerticalAlignment="Top" VerticalContentAlignment="Center">

            <ComboBox.ItemTemplate>
                <DataTemplate>
                    <TextBlock Text="{Binding LocalFontName}" FontFamily="{Binding FontFamily}"/>
                </DataTemplate>
            </ComboBox.ItemTemplate>
        </ComboBox>
    </Grid>
</Window>
XAML(リストボックス)
リストボックスでフォントを選択する場合は次のようになります。
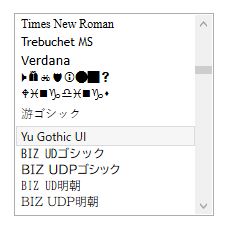
ComoBoxの場合と同様、ListBoxのDataTemplateにTextBlock を配置し、フォント名を該当するフォントを使って表示します。
ComboBoxのXAMLと見比べていただくとわかると思いますが、<ComboBox.ItemTemplate> が <ListBox.ItemTemplate>に変わっただけで、あとは全く同じです。
Window x:Class="FontSelectTest.MainWindow"
        xmlns="http://schemas.microsoft.com/winfx/2006/xaml/presentation"
        xmlns:x="http://schemas.microsoft.com/winfx/2006/xaml"
        xmlns:d="http://schemas.microsoft.com/expression/blend/2008"
        xmlns:mc="http://schemas.openxmlformats.org/markup-compatibility/2006"
        xmlns:local="clr-namespace:FontSelectTest"
        mc:Ignorable="d"
        Title="MainWindow" Height="290.164" Width="572.541">
    <Grid>
        <ListBox Width="200" Height="203" Margin="327,28,0,0" HorizontalAlignment="Left" ItemsSource="{Binding}" VerticalAlignment="Top">
            <ListBox.ItemTemplate>
                <DataTemplate>
                    <TextBlock Text="{Binding LocalFontName}" FontFamily="{Binding FontFamily}"/>
                </DataTemplate>
            </ListBox.ItemTemplate>
        </ListBox>
    </Grid>
</Window>
まとめ
今回はWindowsで利用可能なフォント一覧の取得と、コンボボックス、及びリストボックスを使ってフォントを選択する方法について解説しました。
フォント一覧は Fonts.SystemFontFamiliesで取得できますが、取得できるフォント名はすべて英語表記になっているため、日本語フォントは日本語名に変換する必要があります。
また、コンボボックス及びリストボックスに、フォント名に対応するフォントで表示するためには、<ComboBox.ItemTemplate>、及び<ListBox.ItemTemplate>にTextBlockを定義し、そこに表示します。
この方法以外にもやり方があると思いますので、その中の1つの方法として活用していただければと思います。


コメント