DataGridの多段表示ですが、【WPF】ここまで出来る!DataGridで多段表示!(DataGridTemplateColumn編)の記事ではXAMLのレイアウトのみで実現しました。
1つのセルに複数の項目を表示する場合、単純なものであればXAMLだけでも良いのですが、複雑なロジックが伴う場合や、もっと凝ったレイアウトにしたい場合、XAMLだけではコードが複雑になってしまいます。
そこで、今回はセルにユーザーコントロールを張り付けて多段表示を実現してみました。
ユーザーコントロールにするメリットは、そのセルに関するC#のコードが分離できるため、修正や機能追加がやりやすくなるという点です。
今回の記事が、みなさんの開発のヒントにでもなれば幸いです。
UserControlを使ったDataGridの多段表示画面サンプル
今回は次の様なデザインになります。
商品データのセルにユーザーコントロールが張り付けられています。
ユーザーコントロールにすることで、例えば入力時に入力チェックを行ったり、ドロップダウンリストで入力候補を選ばせるといった処理が、メインのコードから切り離して開発できるようになります。
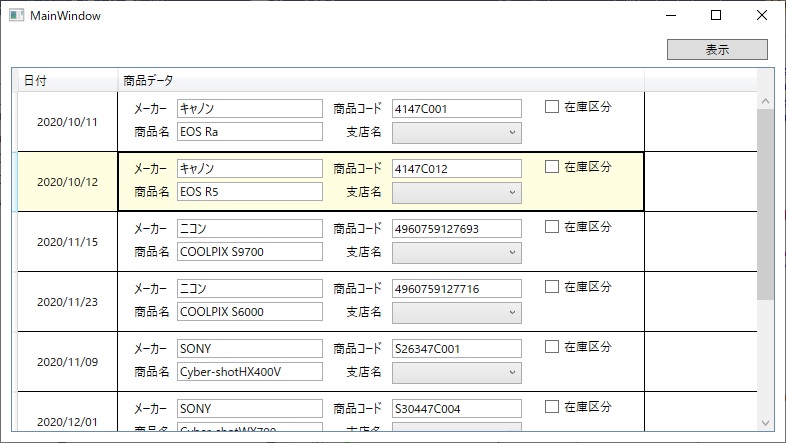
デメリットとしては、DataGridで選択した行の文字色が変わらない事です。
通常、DataGridは選択行の文字色が白になりますが、ユーザーコントロール側は独立しているので変化しません。
DataGridのデフォルトの選択色は比較的濃い青色なので、白文字でないと見難くなります。
フォーカスされたことをユーザーコントロール側に通知して、ユーザーコントロール側で文字色を白にするなどの方法が考えられますが、それも面倒なので、ここではDataGrid側の文字色を黒、選択色を薄い黄色に設定することで見難さを回避しています。
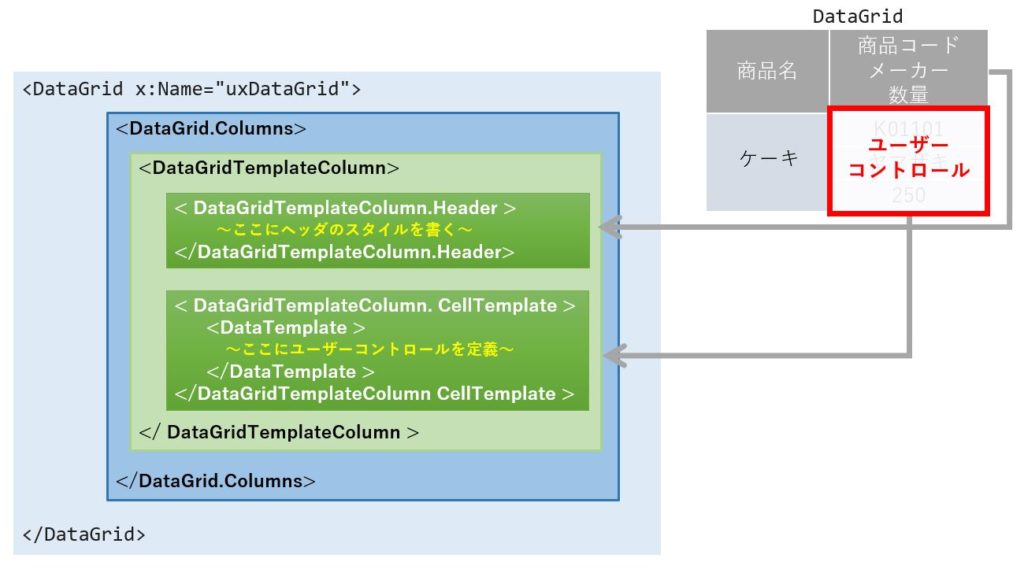
DataGridのレイアウト構造
前回の記事では、DataGridTemplateColumnに複数のコントロールを張り付けて多段表示を実現していましたが、今回はここにユーザーコントロールを張り付けます。
XAMLのコード
多段表示のセルをユーザーコントロールに替えたことで、XAMLのコードはかなりシンプルになりました。
9行目から始まる <Windows.Resource>のタグで、DataGridRowの背景色と文字色、選択セルの枠線の色を定義しています。
また、セルに使ったユーザーコントロールは通常のセルと同様、Binding に対応しています。
<Window x:Class="DataGridLayoutSample.MainWindow"
        xmlns="http://schemas.microsoft.com/winfx/2006/xaml/presentation"
        xmlns:x="http://schemas.microsoft.com/winfx/2006/xaml"
        xmlns:d="http://schemas.microsoft.com/expression/blend/2008"
        xmlns:mc="http://schemas.openxmlformats.org/markup-compatibility/2006"
        xmlns:local="clr-namespace:DataGridLayoutSample"
        mc:Ignorable="d"
        Title="MainWindow" Height="450" Width="800">
    <Window.Resources>
        <Style TargetType="{x:Type DataGridRow}">
            <Style.Resources>
                <SolidColorBrush x:Key="{x:Static SystemColors.HighlightBrushKey}" Color="LightYellow" />
                <SolidColorBrush x:Key="{x:Static SystemColors.ControlBrushKey}" Color="LightYellow" />
                <SolidColorBrush x:Key="{x:Static SystemColors.HighlightTextBrushKey}" Color="Black" />
                <SolidColorBrush x:Key="{x:Static SystemColors.ControlTextBrushKey}" Color="Black" />
            </Style.Resources>
        </Style>
    </Window.Resources>
    <Grid>
        <DataGrid x:Name="uxDataGrid" AutoGenerateColumns="False" ItemsSource="{Binding}" Margin="10,36,10,10">
            <DataGrid.Columns>
                <DataGridTextColumn Header="日付" Width="100" Binding="{Binding Path=日付}">
                    <DataGridTextColumn.ElementStyle>
                        <Style TargetType="TextBlock">
                            <Setter Property="VerticalAlignment" Value="Center"/>
                            <Setter Property="HorizontalAlignment" Value="Center"/>
                        </Style>
                    </DataGridTextColumn.ElementStyle>
                </DataGridTextColumn>

                <DataGridTemplateColumn Header="商品データ">
                    <DataGridTemplateColumn.CellTemplate>
                        <DataTemplate>
                            <Grid>
                                <local:CellUserControl Maker="{Binding メーカー}" ProductName="{Binding 商品名}" ProductCode="{Binding 商品コード}" Padding="0"></local:CellUserControl>
                            </Grid>
                        </DataTemplate>
                    </DataGridTemplateColumn.CellTemplate>
                </DataGridTemplateColumn>
            </DataGrid.Columns>
        </DataGrid>
        <Button x:Name="uxShowData" Content="表示" HorizontalAlignment="Right" Height="21" Margin="0,8,17,0" VerticalAlignment="Top" Width="101" Click="uxShowData_Click"/>

    </Grid>
</Window>
C#のコード
C#側のコードは「【WPF】ここまで出来る!DataGridで多段表示!(DataGridTemplateColumn編)」とまったく同じです。
つまり、ユーザーコントロールを作成したあと、XAML側でユーザーコントロールにBindingするよう記述を変えるだけで済んでしまいます。
using System;
using System.Collections.Generic;
using System.Linq;
using System.Text;
using System.Threading.Tasks;
using System.Windows;
using System.Windows.Controls;
using System.Windows.Data;
using System.Windows.Documents;
using System.Windows.Input;
using System.Windows.Media;
using System.Windows.Media.Imaging;
using System.Windows.Navigation;
using System.Windows.Shapes;
using System.Data;

namespace DataGridLayoutSample
{
    /// <summary>
    /// MainWindow.xaml の相互作用ロジック
    /// </summary>
    public partial class MainWindow : Window
    {
        public MainWindow()
        {
            InitializeComponent();
        }

        private void uxShowData_Click(object sender, RoutedEventArgs e)
        {
            uxDataGrid.DataContext = CreateDataTable();
        }

        private DataTable CreateDataTable()
        {
            var dt = new DataTable();
            dt.Columns.Add("日付");
            dt.Columns.Add("メーカー");
            dt.Columns.Add("商品コード");
            dt.Columns.Add("商品名");
            dt.Columns.Add("単価");
            dt.Columns.Add("数量");

            dt.Rows.Add(dt.NewRow().ItemArray = new string[] { "2020/10/11", "キャノン", "4147C001", "EOS Ra", "150000", "3" });
            dt.Rows.Add(dt.NewRow().ItemArray = new string[] { "2020/10/12", "キャノン", "4147C012", "EOS R5", "160000", "6" });
            dt.Rows.Add(dt.NewRow().ItemArray = new string[] { "2020/11/15", "ニコン", "4960759127693", "COOLPIX S9700 ", "20000", "1" });
            dt.Rows.Add(dt.NewRow().ItemArray = new string[] { "2020/11/23", "ニコン", "4960759127716", "COOLPIX S6000", "20000", "4" });
            dt.Rows.Add(dt.NewRow().ItemArray = new string[] { "2020/11/09", "SONY", "S26347C001", "Cyber-shotHX400V", "123000", "8" });
            dt.Rows.Add(dt.NewRow().ItemArray = new string[] { "2020/12/01", "SONY", "S30447C004", "Cyber-shotWX700", "45000", "12" });
            dt.Rows.Add(dt.NewRow().ItemArray = new string[] { "2020/12/11", "富士フィルム", "FJ55505", "FUJIFILM X-S10", "120000", "3" });

            return dt;
        }

    }
}
ユーザーコントロールのXAML
ユーザーコントロールは次の様なレイアウトになっています。

単純にテキストボックス、コンボボックス、在庫区分の3つを張り付けただけであるため、XAMLもシンプルになっています。
<UserControl x:Class="DataGridLayoutSample.CellUserControl"
             xmlns="http://schemas.microsoft.com/winfx/2006/xaml/presentation"
             xmlns:x="http://schemas.microsoft.com/winfx/2006/xaml"
             xmlns:mc="http://schemas.openxmlformats.org/markup-compatibility/2006"
             xmlns:d="http://schemas.microsoft.com/expression/blend/2008"
             xmlns:local="clr-namespace:DataGridLayoutSample"
             mc:Ignorable="d"
             d:DesignHeight="56" Width="524" Height="57">

    <Grid>
        <CheckBox Content="在庫区分" HorizontalAlignment="Left" Margin="425,6,0,0" VerticalAlignment="Top" Width="95" RenderTransformOrigin="0.979,1.2"/>
        <Label Content="商品名" HorizontalAlignment="Left" Margin="10,25,0,0" VerticalAlignment="Top" RenderTransformOrigin="0.348,0.115"/>
        <TextBox x:Name="uxProductName" IsReadOnly="True" HorizontalAlignment="Left" Margin="58,29,0,0" TextWrapping="Wrap" Width="146" Height="19" VerticalAlignment="Top"/>
        <Label Content="メーカー" HorizontalAlignment="Left" Margin="10,2,0,0" VerticalAlignment="Top"/>
        <TextBox  IsReadOnly="True" x:Name="uxMaker"  HorizontalAlignment="Left" Height="19" Margin="58,6,0,0" TextWrapping="Wrap"  VerticalAlignment="Top" Width="146"/>
        <Label Content="商品コード" HorizontalAlignment="Left" Margin="209,2,0,0" VerticalAlignment="Top"/>
        <TextBox  IsReadOnly="True" x:Name="uxProductCode" HorizontalAlignment="Left" Height="19" Margin="273,6,0,0" TextWrapping="Wrap"  VerticalAlignment="Top" Width="130"/>
        <Label Content="支店名" HorizontalAlignment="Left" Margin="222,25,0,0" VerticalAlignment="Top" RenderTransformOrigin="0.348,0.115"/>
        <ComboBox Text=""  HorizontalAlignment="Left"  Margin="273,29,0,0" Width="130" Height="22" VerticalAlignment="Top">
            <ComboBoxItem>北海道支店</ComboBoxItem>
            <ComboBoxItem>東京支店</ComboBoxItem>
            <ComboBoxItem>大阪支店</ComboBoxItem>
            <ComboBoxItem>愛知支店</ComboBoxItem>
            <ComboBoxItem>京都支店</ComboBoxItem>
            <ComboBoxItem>兵庫支店</ComboBoxItem>
            <ComboBoxItem>四国支店</ComboBoxItem>
            <ComboBoxItem>九州支店</ComboBoxItem>
            <ComboBoxItem>沖縄支店</ComboBoxItem>
        </ComboBox>
    </Grid>
</UserControl>
ユーザーコントロールのC#コード
ユーザーコントロールのC#コードは次の通りです。
特に中身は無いのですが、バインド(Binding) に対応するためのソースコードが大半を占めてしまいました。
普通のプロパティ(public string Maker {get;set;})のように記述するだけでは、Binding出来ません。
Binding に対応するためのプロパティには特別な書き方があり、これを「依存関係プロパティ」と呼んでいます。
今回はメーカー名、商品名、商品コードの3つが Binding できるようになっています。
using System;
using System.Collections.Generic;
using System.Linq;
using System.Text;
using System.Threading.Tasks;
using System.Windows;
using System.Windows.Controls;
using System.Windows.Data;
using System.Windows.Documents;
using System.Windows.Input;
using System.Windows.Media;
using System.Windows.Media.Imaging;
using System.Windows.Navigation;
using System.Windows.Shapes;

namespace DataGridLayoutSample
{
    /// <summary>
    /// CellUserControl.xaml の相互作用ロジック
    /// </summary>
    public partial class CellUserControl : UserControl
    {
        //===================================================================================
        //メーカーの依存関係プロパティの定義
        //===================================================================================
        public static readonly DependencyProperty MakerProperty =
        DependencyProperty.Register("Maker",
                                            typeof(string),
                                            typeof(CellUserControl),
                                            new FrameworkPropertyMetadata("Maker", new PropertyChangedCallback(OnMakerChanged)));
        public string Maker   { get { return (string)GetValue(MakerProperty); } set { SetValue(MakerProperty, value); }  }
        private static void OnMakerChanged(DependencyObject obj, DependencyPropertyChangedEventArgs e)
        {
            var control = (CellUserControl)obj;
            control.uxMaker.Text = (obj != null) ? control.Maker : control.uxMaker.Text;
        }

        //===================================================================================
        //商品コードの依存関係プロパティの定義
        //===================================================================================
        public static readonly DependencyProperty ProductCodeProperty =
               DependencyProperty.Register("ProductCode",
                                            typeof(string),
                                            typeof(CellUserControl),
                                            new FrameworkPropertyMetadata("ProductCode", new PropertyChangedCallback(OnProductCodeChanged)));
        public string ProductCode { get { return (string)GetValue(ProductCodeProperty); } set { SetValue(ProductCodeProperty, value); } }
        private static void OnProductCodeChanged(DependencyObject obj, DependencyPropertyChangedEventArgs e)
        {
            var control = (CellUserControl)obj;
            control.uxProductCode.Text = (obj != null) ? control.ProductCode : control.uxProductCode.Text;
        }

        //===================================================================================
        //商品名の依存関係プロパティの定義
        //===================================================================================
        public static readonly DependencyProperty ProductNameProperty =
               DependencyProperty.Register("ProductName",
                                            typeof(string),
                                            typeof(CellUserControl),
                                            new FrameworkPropertyMetadata("ProductName", new PropertyChangedCallback(OnProductNameChanged)));
        public string ProductName { get { return (string)GetValue(ProductNameProperty); } set { SetValue(ProductNameProperty, value); } }
        private static void OnProductNameChanged(DependencyObject obj, DependencyPropertyChangedEventArgs e)
        {
            var control = (CellUserControl)obj;
            control.uxProductName.Text = (obj != null) ? control.ProductName : control.uxProductName.Text;
        }


        /// <summary>
        /// コンストラクタ
        /// </summary>
        public CellUserControl()
        {
            InitializeComponent();

        }
    }
}
まとめ
以上でユーザーコントロールを使ったDataGridの多段表示の解説は終了です。
<DataGridTemplateColumn> タグに複数のコントロールを記述できますが、今回はそこにユーザーコントロールを記述することで多段表示を実現しました。
ユーザーコントロールにすることで、複雑なUI部分をメイン処理から独立させられるため、機能追加や改修などが行いやすくなるというメリットがあります。
また、通常のセルと同様、ユーザーコントロールを Binding に対応させることが出来ますが、その場合は通常のプロパティではなく、「依存関係プロパティ」という特別な記述が必要となります。
「依存関係プロパティ」については、「【WPF】依存関係プロパティでユーザーコントロールをバインド対応する!」の記事で詳しく触れていますので、興味のある方がご覧ください。


コメント