Windows Form で一覧表の画面を作成する場合、DataGridViewというコントロールを使うのが一般的です。
WPFにおいても、同じ役割を担うコントロールとしてDataGridが用意されているのですが、かなり仕様が違っていてDataGridViewと同じように考えるとうまくいきません。
特にマウスクリックされたセルの行番号・列番号を取得したり、値を設定するといった最も基本的な部分が大きく異なっています。
今回は、一覧表を使ったアプリケーションで最もよく使われるであろう、マウスクリックやカーソルキーによるセル移動におけるDataGridの取り扱いを解説したいと思います。
尚、WindowsForm 技術者を対象としていますので、MVVMではなくイベントハンドラに処理を記述する前提のサンプルになっています。
プロジェクトのダウンロード
Visual Studioのプロジェクトを一式、下記からダウンロードできます。
サンプルプログラムの概要
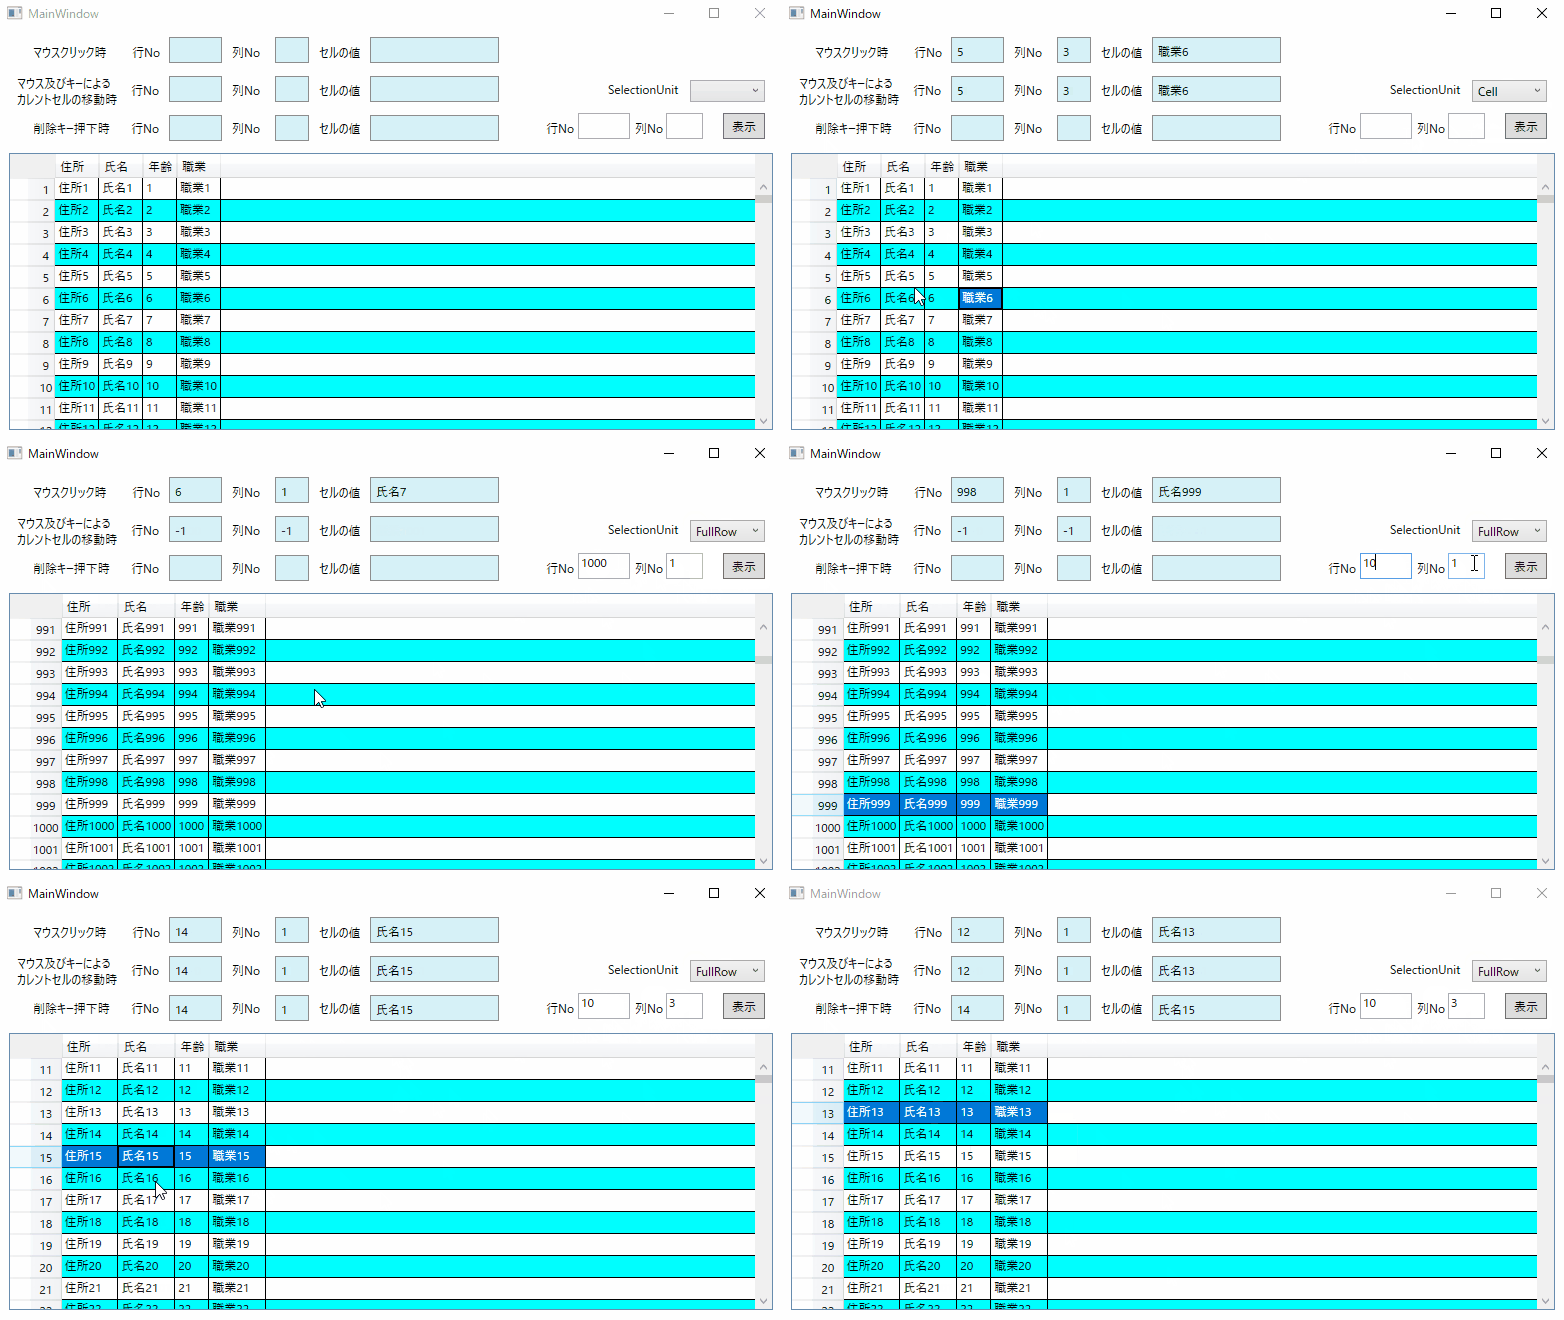
サンプルプログラムは次の機能を試すように作っています。
- マウスクリックした時の行と列の番号
- マウス及びカーソルキーによる行/セル移動における行と列番号
- 削除キー押下時のカレント行(又はセル)の行と列番号
- 指定した行/列番号への移動と表示
- 行選択モード/セル選択モードの繰り替え
また、上記に加えて
- 行番号の表示
- 仮想表示モードによる高速化
- コンテキストメニュー表示
- コンテキストメニュー表示時DataGridの選択を維持
- ドラッグ&ドロップへの対応
という機能についても搭載しています。
では、まずサンプルプログラムの動作をご覧ください。

ソースコードについて
XamlとC#のソースコードを掲載しておきます。
まずXamlから。
<Window x:Class="DataGridTest.MainWindow"
        xmlns="http://schemas.microsoft.com/winfx/2006/xaml/presentation"
        xmlns:x="http://schemas.microsoft.com/winfx/2006/xaml"
        xmlns:d="http://schemas.microsoft.com/expression/blend/2008"
        xmlns:mc="http://schemas.openxmlformats.org/markup-compatibility/2006"
        xmlns:local="clr-namespace:DataGridTest"
        mc:Ignorable="d"
        Title="MainWindow" Height="450" Width="800">
    <Grid>
        <Grid.ColumnDefinitions>
            <ColumnDefinition/>
        </Grid.ColumnDefinitions>
        <Grid.RowDefinitions>
            <RowDefinition Height="120"/>
            <RowDefinition Height="302*"/>
        </Grid.RowDefinitions>


        <DataGrid x:Name ="uxDataGrid"
                  Grid.Row="1"
                  AlternatingRowBackground="Aqua"
                  SelectionMode="Single"
                  Focusable="True"
                  IsReadOnly="True"
                  SelectionUnit="FullRow"
                  ItemsSource="{Binding}"
                  EnableColumnVirtualization="True"
                  EnableRowVirtualization="True"
                  VirtualizingPanel.IsVirtualizing="True"
                  VirtualizingPanel.VirtualizationMode="Recycling" Margin="10,4,10,10"
                  PreviewMouseDown="uxDataGrid_PreviewMouseDown"
                  PreviewKeyDown="uxDataGrid_PreviewKeyDown"
                  CurrentCellChanged="uxDataGrid_CurrentCellChanged"
                  >
            <!-- 右クリックによるコンテキストメニュー表示時、選択中セルの背景色/テキスト色が解除されないようにするためのコード-->
            <DataGrid.Resources>
                <!-- 選択中セルの背景色(フォーカス有りの時) -->
                <SolidColorBrush x:Key="{x:Static SystemColors.HighlightBrushKey}" Color="#0078d7"  />
                <!-- 選択中セルの文字色(フォーカス有りの時) -->
                <SolidColorBrush x:Key="{x:Static SystemColors.HighlightTextBrushKey}" Color="White"  />
                <!-- 選択中セルの背景色(フォーカス無しの時) -->
                <SolidColorBrush x:Key="{x:Static SystemColors.InactiveSelectionHighlightBrushKey}" Color="#0078d7" />
                <!-- 選択中セルの文字色(フォーカス無しの時) -->
                <SolidColorBrush x:Key="{x:Static SystemColors.InactiveSelectionHighlightTextBrushKey}" Color="White" />
            </DataGrid.Resources>
            <!-- 右クリックによるコンテキストメニューの表示-->
            <DataGrid.ContextMenu>
                <ContextMenu x:Name="uxDataGridContextMenu">
                    <MenuItem Header="コピー"  />
                    <MenuItem Header="貼り付け" />
                </ContextMenu>
            </DataGrid.ContextMenu>
        </DataGrid>


        <Label x:Name="uxClickRowIndex" Height="26" Margin="170,8,0,0" VerticalAlignment="Top" BorderBrush="#FF8D8D8D" Background="#FFD6F1F7" BorderThickness="1" HorizontalAlignment="Left" Width="53"/>
        <Label x:Name="uxClickColumnIndex" Height="26" Margin="276,8,0,0" VerticalAlignment="Top" BorderBrush="#FF8D8D8D" Background="#FFD6F1F7" BorderThickness="1" HorizontalAlignment="Left" Width="34"/>
        <Label x:Name="uxClickValue" Height="26" Margin="371,8,0,0" VerticalAlignment="Top" BorderBrush="#FF8D8D8D" Background="#FFD6F1F7" BorderThickness="1" HorizontalAlignment="Left" Width="129"/>
        <Label x:Name="uxCurrentRowIndex" Height="26" Margin="170,47,0,0" VerticalAlignment="Top" BorderBrush="#FF8D8D8D" Background="#FFD6F1F7" BorderThickness="1" HorizontalAlignment="Left" Width="53"/>
        <Label x:Name="uxCurrentColumnIndex" Height="26" Margin="276,47,0,0" VerticalAlignment="Top" RenderTransformOrigin="0.498,1.405" BorderBrush="#FF8D8D8D" Background="#FFD6F1F7" BorderThickness="1" HorizontalAlignment="Left" Width="34"/>
        <Label x:Name="uxCurrentVal" Height="26" Margin="371,47,0,0" VerticalAlignment="Top" RenderTransformOrigin="0.498,1.405" BorderBrush="#FF8D8D8D" Background="#FFD6F1F7" BorderThickness="1" HorizontalAlignment="Left" Width="129"/>
        <Label x:Name="uxSelectedRowIndex" Height="26" Margin="170,86,0,0" VerticalAlignment="Top" BorderBrush="#FF8D8D8D" Background="#FFD6F1F7" BorderThickness="1" HorizontalAlignment="Left" Width="53"/>
        <Label x:Name="uxSelectedColumnIndex" Height="26" Margin="276,86,0,0" VerticalAlignment="Top" RenderTransformOrigin="0.498,1.405" BorderBrush="#FF8D8D8D" Background="#FFD6F1F7" BorderThickness="1" HorizontalAlignment="Left" Width="34"/>
        <Label x:Name="uxSelectedVal" Height="26" Margin="371,86,0,0" VerticalAlignment="Top" RenderTransformOrigin="0.498,1.405" BorderBrush="#FF8D8D8D" Background="#FFD6F1F7" BorderThickness="1" HorizontalAlignment="Left" Width="129"/>
        <Label Content="マウスクリック時" HorizontalAlignment="Left" Margin="29,10,0,0" VerticalAlignment="Top" Width="83" Height="26"/>
        <Label Content="行No" HorizontalAlignment="Left" Margin="127,48,0,0" VerticalAlignment="Top" Height="26" Width="38"/>
        <Label Content="行No" HorizontalAlignment="Left" Margin="127,86,0,0" VerticalAlignment="Top" RenderTransformOrigin="0.49,2.49" Height="26" Width="38"/>
        <Label Content="列No" HorizontalAlignment="Left" Margin="228,10,0,0" VerticalAlignment="Top" Height="26" Width="38"/>
        <Label Content="列No" HorizontalAlignment="Left" Margin="228,48,0,0" VerticalAlignment="Top" Height="26" Width="38"/>
        <Label Content="列No" HorizontalAlignment="Left" Margin="228,86,0,0" VerticalAlignment="Top" RenderTransformOrigin="0.49,2.49" Height="26" Width="38"/>
        <Label Content="セルの値" HorizontalAlignment="Left" Margin="315,10,0,0" VerticalAlignment="Top" Height="26" Width="51"/>
        <Label Content="セルの値" HorizontalAlignment="Left" Margin="315,48,0,0" VerticalAlignment="Top" Height="26" Width="51"/>
        <Label Content="セルの値" HorizontalAlignment="Left" Margin="315,86,0,0" VerticalAlignment="Top" RenderTransformOrigin="0.49,2.49" Height="26" Width="51"/>
        <Label Content="行No" HorizontalAlignment="Left" Margin="128,10,0,0" VerticalAlignment="Top" Width="39" Height="26"/>
        <TextBlock TextWrapping="Wrap"  HorizontalAlignment="Left" Margin="18,46,0,0" VerticalAlignment="Top" Width="108" Height="42"><Run Text="マウス及びキーによる"/><Run Text=" "/><Run Text="カレントセルの移動時"/></TextBlock>
        <Label Content="削除キー押下時" HorizontalAlignment="Left" Margin="29,86,0,0" VerticalAlignment="Top" Width="97" Height="26"/>
        <ComboBox x:Name="uxSelectedUnit" HorizontalAlignment="Left" Margin="691,51,0,0" VerticalAlignment="Top" Width="75" SelectionChanged="uxSelectedUnit_SelectionChanged">
            <ComboBoxItem Content="Cell"/>
            <ComboBoxItem Content="FullRow"/>
        </ComboBox>
        <Label x:Name="uxSelectionUnit" Content="SelectionUnit" HorizontalAlignment="Left" Margin="604,47,0,0" VerticalAlignment="Top" Width="83" Height="26" RenderTransformOrigin="0.771,0.769"/>
        <TextBox x:Name="uxRowNo" Height="26" Margin="579,84,0,0" VerticalAlignment="Top" RenderTransformOrigin="0.498,1.405" HorizontalAlignment="Left" Width="52"   />
        <TextBox x:Name="uxColumnNo" Height="26" Margin="667,84,0,0" VerticalAlignment="Top" RenderTransformOrigin="0.498,1.405" HorizontalAlignment="Left" Width="37"/>
        <Label Content="行No" HorizontalAlignment="Left" Margin="542,86,0,0" VerticalAlignment="Top" RenderTransformOrigin="0.49,2.49" Height="26" Width="38"/>
        <Label Content="列No" HorizontalAlignment="Left" Margin="631,86,0,0" VerticalAlignment="Top" RenderTransformOrigin="0.49,2.49" Height="26" Width="38"/>
        <Button x:Name="uxSetFocus" Content="表示" HorizontalAlignment="Left" Margin="724,84,0,0" VerticalAlignment="Top" Width="42" Height="26" Click="uxSetFocus_Click"/>
    </Grid>
</Window>
次はC#のソースコードになります。
using System;
using System.Collections.Generic;
using System.Data;
using System.Linq;
using System.Text;
using System.Threading.Tasks;
using System.Windows;
using System.Windows.Controls;
using System.Windows.Data;
using System.Windows.Documents;
using System.Windows.Input;
using System.Windows.Media;
using System.Windows.Media.Imaging;
using System.Windows.Navigation;
using System.Windows.Shapes;

namespace DataGridTest
{
    /// <summary>
    /// MainWindow.xaml の相互作用ロジック
    /// </summary>
    public partial class MainWindow : Window
    {
        /// <summary>
        /// コンストラクタ
        /// </summary>
        public MainWindow()
        {
            InitializeComponent();

            // DataGridの行ヘッダに行Noを表示するためのイベント処理を登録
            EnableRowNum(uxDataGrid);

            //ドラッグ&ドロップを行うためのイベント処理を登録
            EnableDragDrop(uxDataGrid);

            // 表示用テストデータの生成とDataGridへの表示
            uxDataGrid.DataContext = CreateData();
        }

        /// <summary>
        /// 表示用テストデータの生成
        /// </summary>
        /// <returns></returns>
        public DataTable CreateData()
        {
            DataTable dt = new DataTable();

            string[] columns = new string[] { "住所", "氏名", "年齢", "職業" };
            columns.Select(i => dt.Columns.Add(i)).ToArray();

            for(int n = 1;n <= 10000;n ++)
            {
                DataRow dr = dt.NewRow();
                dr[0] = "住所" + n.ToString();
                dr[1] = "氏名" + n.ToString();
                dr[2] = n.ToString();
                dr[3] = "職業" + n.ToString();
                dt.Rows.Add(dr);
            }

            return dt;
        }

        /// <summary>
        /// マウスクリック時のイベント処理
        /// </summary>
        /// <param name="sender"></param>
        /// <param name="e"></param>
        private void uxDataGrid_PreviewMouseDown(object sender, MouseButtonEventArgs e)
        {
            (var rowIndex,var columnIndex) = ClickCellIndex(uxDataGrid, e.GetPosition(uxDataGrid));
            uxClickColumnIndex.Content = columnIndex;
            uxClickRowIndex.Content = rowIndex;
            uxClickValue.Content = (rowIndex >= 0 && columnIndex >= 0) ? (uxDataGrid.Items[rowIndex] as DataRowView).Row[columnIndex] : "";

        }

        /// <summary>
        /// キー入力時のイベント処理
        /// </summary>
        /// <param name="sender"></param>
        /// <param name="e"></param>
        private void uxDataGrid_PreviewKeyDown(object sender, KeyEventArgs e)
        {
            //削除キーの押下チェック
            if (e.Key == Key.Delete)
            {
                (var rowIndex, var columnIndex) = CurrentCellIndex(uxDataGrid);
                uxSelectedColumnIndex.Content = columnIndex;
                uxSelectedRowIndex.Content = rowIndex;
                uxSelectedVal.Content = (uxDataGrid.Items[rowIndex] as DataRowView).Row[columnIndex];
            }
        }

        /// <summary>
        /// カレントセル変化時のイベント処理
        /// </summary>
        /// <param name="sender"></param>
        /// <param name="e"></param>
        private void uxDataGrid_CurrentCellChanged(object sender, EventArgs e)
        {
            (var rowIndex, var columnIndex) = CurrentCellIndex(uxDataGrid);
            uxCurrentColumnIndex.Content = columnIndex;
            uxCurrentRowIndex.Content = rowIndex;
            uxCurrentVal.Content = (rowIndex >= 0 && columnIndex >= 0) ? (uxDataGrid.Items[rowIndex] as DataRowView).Row[columnIndex] : "";
        }

        /// <summary>
        /// 指定した行を選択行に設定
        /// </summary>
        /// <param name="sender"></param>
        /// <param name="e"></param>
        private void uxSetFocus_Click(object sender, RoutedEventArgs e)
        {
            var row = int.Parse(uxRowNo.Text);
            var col = int.Parse(uxColumnNo.Text);
            if (uxDataGrid.SelectionUnit == DataGridSelectionUnit.Cell)
                ScrollToCellIndex(uxDataGrid, row, col);
            else
                ScrollToRowIndex(uxDataGrid, row);
        }

        /// <summary>
        /// 指定した行番号までスクロールする
        /// </summary>
        /// <param name="dataGrid"></param>
        /// <param name="rowIndexx"></param>
        public void ScrollToRowIndex(DataGrid dataGrid,int rowIndex)
        {
            dataGrid.Focus();
            DataGridCellInfo info = new DataGridCellInfo(dataGrid.Items[rowIndex], dataGrid.Columns[0]);
            dataGrid.CurrentCell = info;
            dataGrid.ScrollIntoView(dataGrid.Items[rowIndex]);
            dataGrid.SelectedIndex = rowIndex;
        }

        /// <summary>
        /// 指定したセルまでスクロール
        /// </summary>
        /// <param name="dataGrid"></param>
        /// <param name="rowIndex"></param>
        /// <param name="columnIndex"></param>
        public void ScrollToCellIndex(DataGrid dataGrid, int rowIndex,int columnIndex)
        {
            dataGrid.Focus();
            DataGridCellInfo info = new DataGridCellInfo(dataGrid.Items[rowIndex], dataGrid.Columns[columnIndex]);
            dataGrid.CurrentCell = info;
            dataGrid.ScrollIntoView(dataGrid.Items[rowIndex], dataGrid.Columns[columnIndex]);
            ((DataGridCell)info.Column.GetCellContent(info.Item).Parent).IsSelected = true;
        }

        /// <summary>
        /// 選択されている(カーソルが当たっている)行番号と列番号の取得
        /// </summary>
        /// <param name="dataGrid"></param>
        /// <returns></returns>
        public (int rowIndex, int columnIndex) SelectedCellIndex(DataGrid dataGrid)
        {
            return (dataGrid.SelectedIndex,dataGrid.CurrentCell.Column.DisplayIndex);
        }

        /// <summary>
        /// カレントセルの行番号と列番号の取得
        /// </summary>
        /// <param name="dataGrid"></param>
        /// <returns></returns>
        public (int rowIndex,int columnIndex) CurrentCellIndex(DataGrid dataGrid)
        {
            if(dataGrid.CurrentItem == null || dataGrid.CurrentCell == null)
            {
                return (-1,-1);
            }
            return (dataGrid.Items.IndexOf(dataGrid.CurrentItem),dataGrid.CurrentCell.Column.DisplayIndex);
        }

        /// <summary>
        /// クリックされたセルの行番号と列番号の取得
        /// </summary>
        /// <param name="dataGrid"></param>
        /// <param name="pos"></param>
        /// <returns></returns>
        public (int rowIndex,int columnIndex) ClickCellIndex(DataGrid dataGrid, Point pos)
        {
            DependencyObject dep = VisualTreeHelper.HitTest(dataGrid, pos)?.VisualHit;
            int rowIndex = -1;
            int columnIndex = -1;

            while (dep != null)
            {
                dep = VisualTreeHelper.GetParent(dep);

                while (dep != null)
                {
                    if (dep is DataGridCell)
                    {
                        columnIndex = (dep == null) ? -1 : (dep as DataGridCell).Column.DisplayIndex;
                    }
                    if(dep is DataGridRow)
                    {
                        rowIndex = (dep == null) ? -1 : (int)(dep as DataGridRow).GetIndex();
                    }

                    if(rowIndex >= 0 && columnIndex >= 0)
                    {
                        break;
                    }

                    dep = VisualTreeHelper.GetParent(dep);
                }
            }
            return (rowIndex,columnIndex);
        }

        /// <summary>
        /// 行Noを表示するためのイベント処理を登録
        /// </summary>
        private void EnableRowNum(DataGrid dataGrid)
        {
            dataGrid.LoadingRow += (sender, e) =>
            {
                e.Row.Header = (e.Row.GetIndex() + 1).ToString().PadLeft(10);
            };

        }

        /// <summary>
        /// ドラッグ&ドロップを行うためのイベント処理を登録
        /// </summary>
        /// <param name="dataGrid"></param>
        private void EnableDragDrop(DataGrid dataGrid)
        {
            dataGrid.AllowDrop = true;

            //ドラッグ&ドロップの処理
            dataGrid.PreviewDragOver += (sender, args) =>
            {
                args.Effects = (args.Data.GetDataPresent(DataFormats.FileDrop) ? DragDropEffects.Copy : DragDropEffects.None);
                //コントロールの種類によって、下記の記述が必要(PreviewDropが効かない場合がある) なので、念のため
                args.Handled = true;
            };

            dataGrid.PreviewDrop += (sender, args) =>
            {
                if (args.Data.GetDataPresent(DataFormats.FileDrop))
                {
                    string[] files = (string[])args.Data.GetData(DataFormats.FileDrop);

                    //ここにDrag&Dropの処理を記述
                }
            };

        }

        //DataGrid 選択モード(セル、行)切り替え
        private void uxSelectedUnit_SelectionChanged(object sender, SelectionChangedEventArgs e)
        {
            switch(uxSelectedUnit.SelectedIndex)
            {
                case 0: uxDataGrid.SelectionUnit = DataGridSelectionUnit.Cell; break;
                case 1: uxDataGrid.SelectionUnit = DataGridSelectionUnit.FullRow; break;
            }
        }
    }
}
要点の解説
まず前提として、サンプルプログラムでは、それぞれの処理をメソッド化しており、イベントハンドラからメソッドを呼ぶような作りにしています。
細かい部分はソースコードを見て頂くとして、ここではメソッドを中心に要点を解説していきたいと思います。
DataTableをDataGridに表示
DataTableをDataGridに表示する方法は次の通りです。
Xaml側
<DataGrid x:Name ="uxDataGrid" ItemsSource="{Binding}" />C#ソースコード
DataTable dt = CreateData();  //表示したいDataTableを作成
uxDataGrid.DataContext = dt;  //DataGridのDataContext にDataTableを代入
DataGridは、ItemSource プロパティに表示したいコレクションをセットすることで表示できます。
ただ、ItemSource にDataTable をセットしようとした場合
- コレクションに変換するのが面倒
- DataContextを経由してItemSourceにバインドするのが楽
という理由から、DataContextにDataTableをセットし、Xaml上で ItemSource にバインド(ItemSource = "{Binding}")して使います。
DataContextはobject 型であるため、DataTableを型変換無しにそのままセット出来ますし、逆に取り出したい時は (DataTable) で型変換するだけで済むので、DataGridVIewのDataSourceプロパティと同じ様に取り扱いできます。
指定した行番号までスクロールして表示
DataGridViewに比べて取り回しが面倒ですが、次のソースコードで指定した行にジャンプし、選択状態にすることが出来ます。
但し、これは SelectedUnit(行選択かセル選択かを示すプロパティ)に行選択モード( FullRow) が設定されている場合のみ有効です。
        public void ScrollToRowIndex(DataGrid dataGrid,int rowIndex)
        {
            dataGrid.Focus();
            DataGridCellInfo info = new DataGridCellInfo(dataGrid.Items[rowIndex], dataGrid.Columns[0]);
            dataGrid.CurrentCell = info;
            dataGrid.ScrollIntoView(dataGrid.Items[rowIndex]);
            dataGrid.SelectedIndex = rowIndex;
        }
行番号と列番号で指定されたセルまでスクロールして表示
こちらは、行と列を指定すると、カレントセルの位置までスクロールして選択状態で表示してくれます。
SelectedUnit にセル選択モード( Cell) が設定されている場合のみ有効です。
        public void ScrollToCellIndex(DataGrid dataGrid, int rowIndex,int columnIndex)
        {
            dataGrid.Focus();
            DataGridCellInfo info = new DataGridCellInfo(dataGrid.Items[rowIndex], dataGrid.Columns[columnIndex]);
            dataGrid.CurrentCell = info;
            dataGrid.ScrollIntoView(dataGrid.Items[rowIndex], dataGrid.Columns[columnIndex]);
            ((DataGridCell)info.Column.GetCellContent(info.Item).Parent).IsSelected = true;
        }
選択セルの行番号と列番号を取得
選択されている(背景色が青表示)セルの行と列の番号が取得できます。
ただ、未選択状態の場合は、CurrentCellが null になったり、SelectedIndex が -1 にってエラーになりますので、何らかの対策が必要です。
ちなみに、今回のサンプルには入っていますが、どのイベントからも呼び出していないので、興味のある方はサンプルを書き換えて実験してみて下さい。
        public (int rowIndex, int columnIndex) SelectedCellIndex(DataGrid dataGrid)
        {
            return (dataGrid.SelectedIndex,dataGrid.CurrentCell.Column.DisplayIndex);
        }
カレントセルの行番号と列番号の取得
カレントセルの行番号と列番号を取得します。
列ヘッダのクリックや、他のコントロールをクリックするとカレントセルが取得できなくなり、CurrentItem や CurrentCell が null となってしまいます。
その為、null チェックを入れています。
SelectedUnit が Cell、 FullRow のどちらでも正しく行、列の番号が取得できるので、使い勝手は良いです。
        public (int rowIndex,int columnIndex) CurrentCellIndex(DataGrid dataGrid)
        {
            if(dataGrid.CurrentItem == null || dataGrid.CurrentCell == null)
            {
                return (-1,-1);
            }
            return (dataGrid.Items.IndexOf(dataGrid.CurrentItem),dataGrid.CurrentCell.Column.DisplayIndex);
        }
マウス及びキーボード操作のいずれかでセルが変更されてた時、何らかの処理を行わせたい場合 CurrentCellChanged のイベントハンドラを使います。
また、削除や挿入などのキー操作の際、対象となる行、列を特定する場合は、PreviewKeyDown を使います。
マウスクリックしたセルの行番号と列番号を取得
マウスクリックしたセルの行と列の番号は次のソースコードで取得できます。
マウスでクリックした座標からセルを特定するので、これを使う場合は PreviewMouseDown イベントハンドラから呼び出してください。
その際、第1引数にはDataGridコントロールを、第2引数には、DataGridコントロールがクリックされたマウス座標を渡すのですが、このマウス座標は e.GetPosition(DataGridコントロール) メソッドで取得した値を渡します。
        public (int rowIndex,int columnIndex) ClickCellIndex(DataGrid dataGrid, Point pos)
        {
            DependencyObject dep = VisualTreeHelper.HitTest(dataGrid, pos)?.VisualHit;
            int rowIndex = -1;
            int columnIndex = -1;

            while (dep != null)
            {
                dep = VisualTreeHelper.GetParent(dep);

                while (dep != null)
                {
                    if (dep is DataGridCell)
                    {
                        columnIndex = (dep == null) ? -1 : (dep as DataGridCell).Column.DisplayIndex;
                    }
                    if(dep is DataGridRow)
                    {
                        rowIndex = (dep == null) ? -1 : (int)(dep as DataGridRow).GetIndex();
                    }

                    if(rowIndex >= 0 && columnIndex >= 0)
                    {
                        break;
                    }

                    dep = VisualTreeHelper.GetParent(dep);
                }
            }
            return (rowIndex,columnIndex);
        }
行番号を表示する
単純に、行ヘッダに番号を表示しているだけです。
Googleで検索すると、同じようなソースコートがヒットすると思います。
この方法はあくまでも簡易的なため、たまに表示ズレを起こす事が有ります。
        private void EnableRowNum(DataGrid dataGrid)
        {
            dataGrid.LoadingRow += (sender, e) =>
            {
                e.Row.Header = (e.Row.GetIndex() + 1).ToString().PadLeft(10);
            };

        }
ドラッグ&ドロップの付与
このブログではお馴染みですが、ドラッグ&ドロップをDataGridに付与するソースコードです。
WindowsForm の場合と微妙に異なりますので、WPFの場合はこちらをお使い下さい。
        private void EnableDragDrop(DataGrid dataGrid)
        {
            dataGrid.AllowDrop = true;

            //ドラッグ&ドロップの処理
            dataGrid.PreviewDragOver += (sender, args) =>
            {
                args.Effects = (args.Data.GetDataPresent(DataFormats.FileDrop) ? DragDropEffects.Copy : DragDropEffects.None);
                //コントロールの種類によって、下記の記述が必要(PreviewDropが効かない場合がある) なので、念のため
                args.Handled = true;
            };

            dataGrid.PreviewDrop += (sender, args) =>
            {
                if (args.Data.GetDataPresent(DataFormats.FileDrop))
                {
                    string[] files = (string[])args.Data.GetData(DataFormats.FileDrop);

                    //ここにDrag&Dropの処理を記述
                }
            };

        }
仮想表示モードによる高速化
WindowsForm のDataGridView に比べて、WPFのDataGridの表示速度は非常に遅く、ずいぶんもっさりしています。
これを解決する方法として、仮想表示モードというのがあります。
Xamlで以下の様に記述することで、DataGridViewにかなり近い表示速度になります。
 <DataGrid x:Name ="uxDataGrid" ItemsSource="{Binding}"
              EnableColumnVirtualization="True"
              EnableRowVirtualization="True"
              VirtualizingPanel.IsVirtualizing="True"
              VirtualizingPanel.VirtualizationMode="Recycling" Margin="10,4,10,10" />
コンテキストメニュー表示
コンテキストメニューは次の様に記述します。
<Menu Item> は入れ子で階層化が可能で、
- それぞれに名前を付けてイベントハンドラを作る
- 1つのイベントハンドラの中で、 sender を見て処理を分ける
- Command を定義して呼び出す
という方法でメニューを実装できます。
        <DataGrid.ContextMenu>
            <ContextMenu x:Name="uxDataGridContextMenu">
                <MenuItem Header="コピー" />
                <MenuItem Header="貼り付け" />
            </ContextMenu>
        </DataGrid.ContextMenu>
コンテキストメニュー表示時DataGridの選択を維持
DataGridで右クリックによるコンテキストメニュー表示時、DataGridの選択状態(セル背景が青色)が解除されたように見えてしまいます。
実際には薄い背景色が表示されているのですが、見た目上選択が解除されたように見えてしまいます。
これを解決するため、右クリック時にも選択中と同じ背景色と文字色になるよう設定しています。
        <DataGrid.Resources>
            <!-- 選択中セルの背景色(フォーカス有りの時) -->
            <SolidColorBrush x:Key="{x:Static SystemColors.HighlightBrushKey}" Color="#0078d7"  />
            <!-- 選択中セルの文字色(フォーカス有りの時) -->
            <SolidColorBrush x:Key="{x:Static SystemColors.HighlightTextBrushKey}" Color="White"  />
            <!-- 選択中セルの背景色(フォーカス無しの時) -->
            <SolidColorBrush x:Key="{x:Static SystemColors.InactiveSelectionHighlightBrushKey}" Color="#0078d7" />
            <!-- 選択中セルの文字色(フォーカス無しの時) -->
            <SolidColorBrush x:Key="{x:Static SystemColors.InactiveSelectionHighlightTextBrushKey}" Color="White" />
        </DataGrid.Resources>
列の右寄せ
列に値される値は、初期状態では全て左寄せになっています。
例えば数値項目だったら右寄せしたり、区分やフラグの項目だったらセンタリングしたい場合があると思います。
DataGridの場合は、次の様に記述することで右寄せやセンタリングが可能です。
private void SetTextAlignment(int columnNo, TextAlignment textAlignment)
{
    var column = (DataGridTextColumn)uxDataGrid.Columns[columnNo];
    var style = new Style();
    style.Setters.Add(new Setter() { Property = TextBlock.TextAlignmentProperty, Value = textAlignment });
    column.CellStyle = style;
}
Xamlで右寄せやセンタリングする場合、 Property や Value を使いますが、これをC#のコードで行っています。
このメソッドの使い方は次の様になります。
//1列目を右寄せ
SetTextAlignment(0, TextAlignment.Right);
//2列目をセンタリング
SetTextAlignment(1, TextAlignment.Center);
この方法を使えば、
style.Setters.Add(new Setter() {Property = Foreground,Value = Brushes.Green } )
と記述することで、その列の文字色を変える事もできます。
カラム名に使うと値が表示されず、最悪エラーになる文字
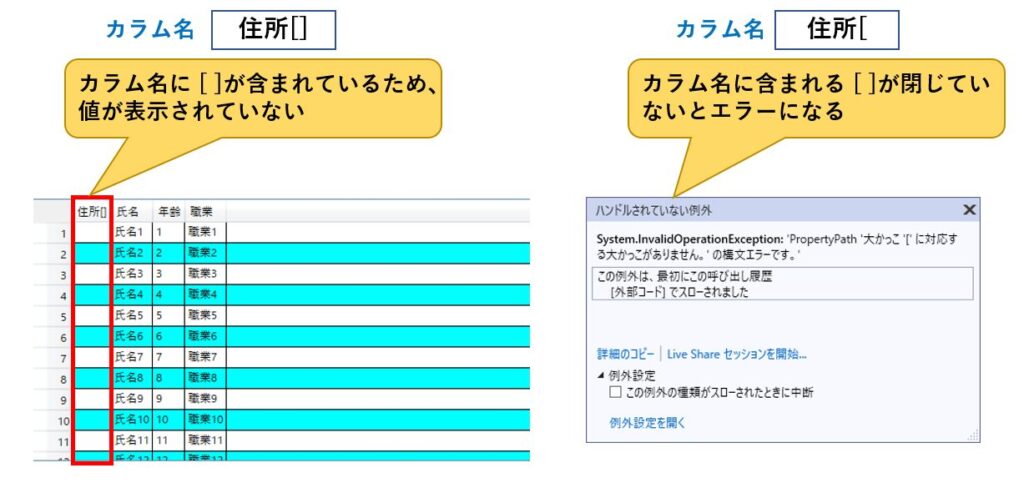
DataGird.DataContext に DataTable を代入して、DataGRidにカラムを自動生成させる場合、DataTableのカラム名に特定の文字が含まれていると、エラーになったり値が表示されなくなるといった問題が発生します。

これはカラム名に、XamlにおけるBindingの予約文字が含まれていた場合に発生します。
予約文字は []()./ の6種類(これ以外にもあるかもしれません)で、これらの文字がカラム名に1つでも含まれていると、そのカラムの値はすべて表示されなくなります。
さらに、[] や () は必ず閉じている(対になっている)必要があり、例えば [ や ( が1つだけしか含まれていない場合、その時点でエラーになってしまいます。
回避方法はいくつかありますが、一番簡単なのは全て全角文字に置き換えることです。
//dtはDataTableのインスタンス

foreach (DataColumn dc in dt.Columns)
{
    dc.ColumnName = dc.ColumnName
        .Replace("[", "[")
        .Replace("]", "]")
        .Replace("(", "(")
        .Replace(")", ")")
        .Replace(".", ".")
        .Replace("/", "/");
}
もう1つの方法は、カラムが自動生成される際に発生するAutoGeneratingColumn イベントハンドラで、予約文字をエスケープしてしまう方法です。
正し、この方法は[] や () が対になっているなら正しく処理できますが、対になっていない場合はエラーが発生してしまいます。
//画面のコンストラクタでイベントハンドラを登録
public MainWindow()
{
     InitializeComponent();
     uxDataGrid.AutoGeneratingColumn += uxDataGrid_AutoGeneratingColumn
}

//イベントハンドラ内で、予約文字を string.Format("[{0}")を使ってエスケープする
private void uxDataGrid_AutoGeneratingColumn(object sender, DataGridAutoGeneratingColumnEventArgs e)
{
     if ((e.PropertyName.Contains('.') || e.PropertyName.Contains('/')) && e.Column is DataGridBoundColumn)
     {
         var col = e.Column as DataGridBoundColumn;
         col.Binding = new Binding(string.Format("[{0}]", e.PropertyName));
     }
}
もう1つの回避方法として、DataTableを作成する際、カラム名には”Column1","Column2"など予約文字が含まれない名前を付与しておき、元の名前は Caption に記録しておきます。
そして、AutoGeneratingColumn イベントハンドラ内で、DataGridのカラムが生成される直前に HeaderにCaption を代入してしまうという方法です。
例えば、"住所(" "氏名[/" "年齢" "職業" というカラム名にしたい場合、ColomnNameには Add("") メソッドで自動的な連番名を付与しておき、元のカラム名は Caption に登録しておきます。
string[] columns = new string[] { "住所(", "氏名[/", "年齢", "職業" };
columns.Select(i => dt.Columns.Add("")).ToArray();
Enumerable.Range(0, dt.Columns.Count).Select(i => dt.Columns[i].Caption = columns[i]).ToArray();
AutoGeneratingColumnのイベントハンドラでは、 sender からカラム名とDataContextに登録したDataTable(実際はItemSourceからDataViewの形で取り出す)を取得し、PropertyNameに渡された列名("Column1"など)に該当するCaptionを特定、Headerに代入します。
public MainWindow()
{
     InitializeComponent();
     uxDataGrid.AutoGeneratingColumn += uxDataGrid_AutoGeneratingColumn
}

private void uxDataGrid_AutoGeneratingColumn(object sender, DataGridAutoGeneratingColumnEventArgs e)
{
    var column = (DataGridBoundColumn)e.Column;
    var dv = (DataView)((DataGrid)sender).ItemsSource;
    var index = dv.Table.Columns.IndexOf(e.PropertyName);
    column.Header = dv.Table.Columns[index].Caption;
}
DataGridの困った仕様ではありますが、以上の方法で回避することが可能です。
カラム名に表示されない文字
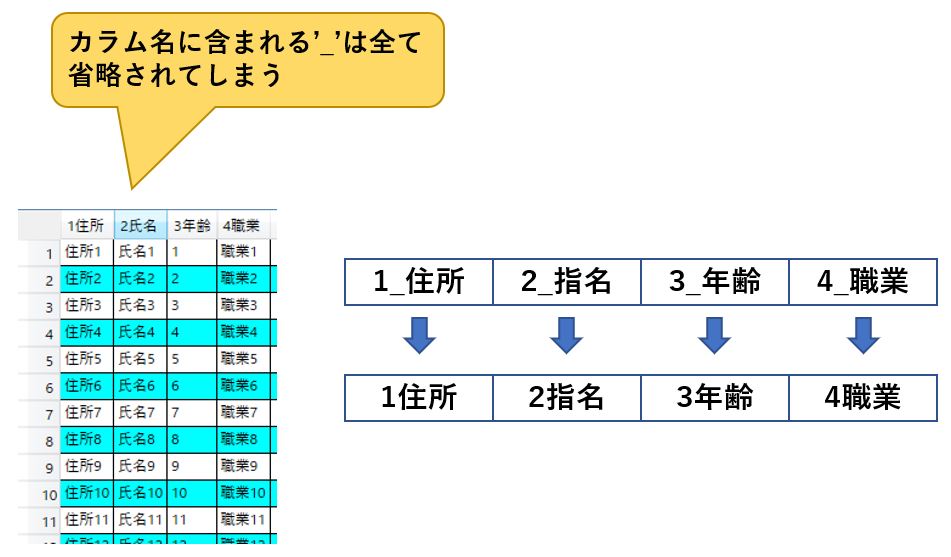
DataGridのカラム名にアンダースコア '_' が含まれていた場合、アンダースコアは表示されません。
DataGridがカラム名に含まれるアンダースコアを、アクセスキーとして判断するためです。

これは、アンダースコアを2つ並べることで解決します。
具体的にいうと、Replace("_","__") としてやることで対応可能です。
[]()./ などの予約文字をカラム名として表示する際、AutoGeneratingColumn イベントハンドラを使うことを先ほど解説しましたが、この部分を次のように書き換えることで解決できます。
public MainWindow()
{
     InitializeComponent();
     uxDataGrid.AutoGeneratingColumn += uxDataGrid_AutoGeneratingColumn
}

private void uxDataGrid_AutoGeneratingColumn(object sender, DataGridAutoGeneratingColumnEventArgs e)
{
    var column = (DataGridBoundColumn)e.Column;
    var dv = (DataView)((DataGrid)sender).ItemsSource;
    var index = dv.Table.Columns.IndexOf(e.PropertyName);

    //アンダースコアを2重にする
    column.Header = dv.Table.Columns[index].Caption.Replace("_","__");
}
まとめ
DataGridは、WindowsFormのDataGridViewと同じ目的のコントロールであり、複数選択、ReadOnly、ユーザー操作による行挿入や削除の禁止など、共通点も多いのですが、カレントセルの行番号、列番号に関する部分は仕様が大きく変わっています。
今回は、DataTableの表示、マウスやカーソル操作におけるセルの行番号、列番号の取得、行番号、列番号による画面スクロールなど、DataGridViewと同じように扱うため、知っておくと便利な点について解説しました。
また、もっさりしていると言われがちな表示速度の改善についても具体的に解説しています。
これでDataGridViewとほぼ同じことが出来るようになると思いますので、WPFへの移行を検討中の方の参考になれば幸いです。


