WindowsForm を使ったデスクトップアプリは気軽に作れて開発の敷居も低いのですが、PCやタブレットなどの異なった解像度での表示ではデザインが崩れるという課題もあります。
そこで、WPFでデスクトップアプリを開発しようという方も多いのではないでしょうか。
WPF といえば MVVM というデザインパターンの利用が推奨されていますが、学習コストを掛けてMVVMを習得する必要があるのでしょうか?
私の答えは「ノー」です。
少なくともDIYプログラミングにおいてMVVMのメリットは生産性を落とすだけで逆効果です。
今回は、その点について私の考えを解説したいと思います。
WPFとMVVM
プログラムを作る上に置いて、プログラムの目的ごとに「プログラムの考え方やプログラムの構成」が色々とパターン化されています。
これをデザインパターンと呼んでいるのですが、MVVMは(Model-View-ViewModel)はデザインパターンの1つです。

詳しくは「世界で一番短いサンプルで覚えるMVVM入門 」の記事をご覧頂くとして、要するにWPFを使ったプログラミングはMVVMと呼ばれるデザインパターンが推奨されています。
WindowsやWord、Excelなどのオフィス製品をはじめ、大人数で開発されているデスクトップアプリケーションの多くでMVVMが使われています。
MVVMは大規模開発でのみ有効な手法
MVVMが登場した背景は、数十人~数百人規模の開発における生産性向上です。
複雑且つ大規模化するアプリケーション開発において、デザイナーとプログラマーを分業化し、後々の仕様変更に対して容易に対応できるよう、デザイン部分とロジック部分を分離するという考え方になっています。
別の見方をすると、デザイン部分とロジック部分するための仕組みをプログラムに組み込んであげる必要があるのです。
DIYプログラミングはそもそも個人が自分に役立つプログラムを作るものですから、開発は1人~数人がほとんどです。まして専属デザイナーいて、プログラミング作業と分業するようなこともありません。
にもかかわらず、MVVMに関する学習コストをかけてデザイン部分とロジック部分を分割し、プログラム随所にMVVMのルールに則ったコードを埋め込んでいくという作業は、明らかにオーバースペックです。
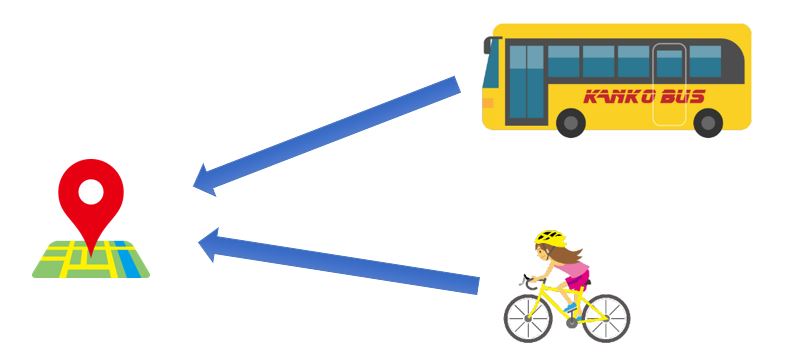
これは、自転車で10分走れば到着できるような場所に、40人乗りのバスを1台借りて行くようなものです。
では、次に簡単なサンプルプログラムを使って検証してみましょう。
従来の方法とMVVMはこんなに違う
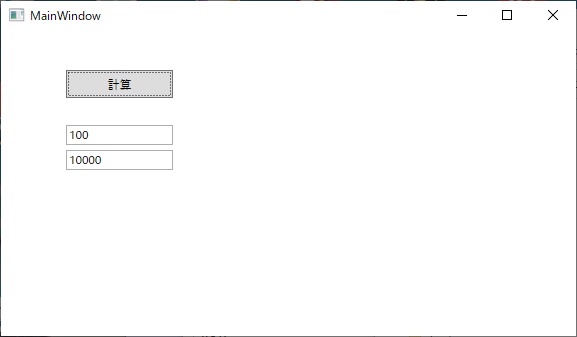
今回作ったプログラムはボタン1個とテキストボックス2個で構成されていて、
- 上段のテキストボックスに任意の数値を入力
- 計算ボタンをクリック
- 下段の敵うとボックスに二乗された値が表示される
というものです。
画面例では、100が入力されていて、100が二乗された答え=10000が下段に表示されています。
従来のイベントを使ったサンプル
従来の方法というのは、WindowsForm で慣れ親しんだイベントハンドラにプログラムを書いていく方法です。
画面に張り付けたコントロールに固有の名前を付与しておいて、イベントハンドラでは名前を使ってコントロールにアクセスし、計算結果を表示するという方法です。
WindowsForm技術者なら、この方法は直感的に分かりやすいと思います。
では、Xamlから見ていきましょう。
<Window x:Class="MvvmTest2.MainWindow"
        xmlns="http://schemas.microsoft.com/winfx/2006/xaml/presentation"
        xmlns:x="http://schemas.microsoft.com/winfx/2006/xaml"
        xmlns:d="http://schemas.microsoft.com/expression/blend/2008"
        xmlns:mc="http://schemas.openxmlformats.org/markup-compatibility/2006"
        xmlns:local="clr-namespace:MvvmTest2"
        mc:Ignorable="d"
        Title="MainWindow" Height="450" Width="800">
    <Grid>
        <Button  x:Name="uxCalc" Content="計算" HorizontalAlignment="Left" Height="28" Margin="65,39,0,0" VerticalAlignment="Top" Width="107" Click="uxCalc_Click"/>
        <TextBox x:Name="uxValue" HorizontalAlignment="Left" Height="20" Margin="65,94,0,0" TextWrapping="Wrap" VerticalAlignment="Top" Width="107"/>
        <TextBox x:Name="uxResult"  HorizontalAlignment="Left" Height="20" Margin="65,119,0,0" TextWrapping="Wrap" VerticalAlignment="Top" Width="107"/>
    </Grid>
</Window>
次に、ソースコートです。
今回はCalcというクラスに値を入れるという事を強引にやっていますが、これはMVVMのサンプルと記述を統一するために行っている処理なので、それ以外に意味は有りません。
uxCalc_Click というイベントハンドラで計算を行い、画面に表示しています。
using System;
using System.Collections.Generic;
using System.ComponentModel;
using System.Linq;
using System.Text;
using System.Threading.Tasks;
using System.Windows;
using System.Windows.Controls;
using System.Windows.Data;
using System.Windows.Documents;
using System.Windows.Input;
using System.Windows.Media;
using System.Windows.Media.Imaging;
using System.Windows.Navigation;
using System.Windows.Shapes;

namespace MvvmTest2
{
    /// <summary>
    /// MainWindow.xaml の相互作用ロジック
    /// </summary>
    public partial class MainWindow : Window
    {
        private Calc Calc { get; set; }
        public MainWindow()
        {
            InitializeComponent();
            Calc = new Calc();
        }

        private void uxCalc_Click(object sender, RoutedEventArgs e)
        {
            Calc.Value = int.Parse(uxValue.Text);
            Calc.Result = Calc.Value * Calc.Value;
            uxResult.Text = Calc.Result.ToString();
        }
    }

    /// Model
    public class Calc
    {
        public int Value { get; set; }
        public int Result { get; set; }
    }
}
MVVMを使ったサンプル
次はMVVMのサンプルです。
MVVMはコードがコードが長くなるので、生産性を高めるためのフレームワーク(Prism、Livet 他)を使いますが、今回は標準機能だけで作っています。
では、Xamlから。
<Window x:Class="MvvmTest2.MainWindow"
        xmlns="http://schemas.microsoft.com/winfx/2006/xaml/presentation"
        xmlns:x="http://schemas.microsoft.com/winfx/2006/xaml"
        xmlns:d="http://schemas.microsoft.com/expression/blend/2008"
        xmlns:mc="http://schemas.openxmlformats.org/markup-compatibility/2006"
        xmlns:local="clr-namespace:MvvmTest2"
        mc:Ignorable="d"
        Title="MainWindow" Height="450" Width="800">
    <Grid>
        <Button Content="計算" HorizontalAlignment="Left" Height="28" Margin="65,39,0,0" VerticalAlignment="Top" Width="107" Command="{Binding CalcCommand}"/>
        <TextBox HorizontalAlignment="Left" Height="20" Margin="65,94,0,0" TextWrapping="Wrap" VerticalAlignment="Top" Width="107" Text="{Binding Value}"/>
        <TextBox HorizontalAlignment="Left" Height="20" Margin="65,119,0,0" TextWrapping="Wrap" VerticalAlignment="Top" Width="107" Text="{Binding Result}"/>

    </Grid>
</Window>
次はソースコードです。コメントを入れると見た目上ソースコード量が増えたような印象を受けますので、今回は省いています。
それでも従来の方法に比べると圧倒的にソースコード量が多くなることが実感できるのではないでしょうか。
using System;
using System.Collections.Generic;
using System.ComponentModel;
using System.Linq;
using System.Text;
using System.Threading.Tasks;
using System.Windows;
using System.Windows.Controls;
using System.Windows.Data;
using System.Windows.Documents;
using System.Windows.Input;
using System.Windows.Media;
using System.Windows.Media.Imaging;
using System.Windows.Navigation;
using System.Windows.Shapes;

namespace MvvmTest2
{
    /// <summary>
    /// MainWindow.xaml の相互作用ロジック
    /// </summary>
    public partial class MainWindow : Window
    {
        public MainWindow()
        {
            InitializeComponent();

            this.DataContext = new ViewModel();
        }

    }

    /// Model
    public class Calc
    {
        public int Value { get; set; }
        public int Result { get; set; }
    }

    /// ViewModel
    public class ViewModel : INotifyPropertyChanged
    {

        public event PropertyChangedEventHandler PropertyChanged;
        public Calc Calc { get; set; }
        public CalcCommand CalcCommand { get; private set; }

        public ViewModel()
        {
            CalcCommand = new CalcCommand(this);
            Calc = new Calc();
        }
        public int Value
        {
            get
            {
                return Calc.Value;
            }
            set
            {
                Calc.Value = value;
                if (PropertyChanged != null)
                {
                    PropertyChanged(this, new PropertyChangedEventArgs("Value"));
                }
            }
        }
        public int Result
        {
            get
            {
                return Calc.Result;
            }
            set
            {
                Calc.Result = value;

                if (PropertyChanged != null)
                {
                    PropertyChanged(this, new PropertyChangedEventArgs("Result"));
                }
            }
        }
    }

    /// Command
    public class CalcCommand : ICommand
    {
        private ViewModel _view { get; set; }

        public CalcCommand(ViewModel view)
        {
            _view = view;
        }

        public event EventHandler CanExecuteChanged
        {
            add { CommandManager.RequerySuggested += value; }
            remove { CommandManager.RequerySuggested -= value; }
        }

        public bool CanExecute(object parameter)
        {
            return true;
        }
        public void Execute(object parameter)
        {
            _view.Result = _view.Value * _view.Value;
        }
    }
}
Prismを使ったMVVMのサンプル
標準機能だけでMVVMをすることは生産性が低すぎるので、通常はMVVMフレームワークを使います。今回は、prism というフレームワークを使ってソースコード量が減った(効率化された)サンプルも提示しておきます。
まずはXamlからですが、参照設定に
xmlns:prism="http://prismlibrary.com/"が入っている以外は、標準機能だけのMVVMとまったく同じです。
<Window x:Class="MvvmTest2.MainWindow"
        xmlns="http://schemas.microsoft.com/winfx/2006/xaml/presentation"
        xmlns:x="http://schemas.microsoft.com/winfx/2006/xaml"
        xmlns:d="http://schemas.microsoft.com/expression/blend/2008"
        xmlns:mc="http://schemas.openxmlformats.org/markup-compatibility/2006"
        xmlns:prism="http://prismlibrary.com/"
        xmlns:local="clr-namespace:MvvmTest2"
        mc:Ignorable="d"
        Title="MainWindow" Height="450" Width="800">
    <Grid>
        <Button Content="計算" HorizontalAlignment="Left" Height="28" Margin="65,39,0,0" VerticalAlignment="Top" Width="107" Command="{Binding CalcCommand}"/>
        <TextBox HorizontalAlignment="Left" Height="20" Margin="65,94,0,0" TextWrapping="Wrap" VerticalAlignment="Top" Width="107" Text="{Binding Value}"/>
        <TextBox HorizontalAlignment="Left" Height="20" Margin="65,119,0,0" TextWrapping="Wrap" VerticalAlignment="Top" Width="107" Text="{Binding Result}"/>

    </Grid>
</Window>
次はソースコードです。
Prismを使う事でかなりシンプルになったことが分かると思います。
でも、やっぱり従来方式に比べてソースコードが長くなりがちですよね。
using System;
using System.Collections.Generic;
using System.ComponentModel;
using System.Linq;
using System.Text;
using System.Threading.Tasks;
using System.Windows;
using System.Windows.Controls;
using System.Windows.Data;
using System.Windows.Documents;
using System.Windows.Input;
using System.Windows.Media;
using System.Windows.Media.Imaging;
using System.Windows.Navigation;
using System.Windows.Shapes;
using System.Windows.Interactivity;
using Prism.Commands;
using Prism.Mvvm;
using Prism.Navigation;
using System.Security.Cryptography.X509Certificates;

namespace MvvmTest2
{
    /// <summary>
    /// MainWindow.xaml の相互作用ロジック
    /// </summary>
    public partial class MainWindow : Window
    {
        public MainWindow()
        {
            InitializeComponent();

            this.DataContext = new ViewModel(new Calc());
        }

    }

    /// Model
    public class Calc
    {
        public int Value { get; set; }
        public int Result { get; set; }
    }

    /// ViewModel
    public class ViewModel : BindableBase
    {

        //Modelのインスタンスを保持するプロパティ
        private Calc Calc { get; set; }

        public DelegateCommand CalcCommand { get; private set; }

        public ViewModel(Calc calc)
        {
            Calc = calc;
            CalcCommand = new DelegateCommand(() =>
            {
                Result = Value * Value;
            },
            () => true);
        }
        public int Value
        {
            get
            {
                return Calc.Value;
            }
            set
            {
                Calc.Value = value;
                RaisePropertyChanged();
            }
        }
        public int Result
        {
            get
            {
                return Calc.Result;
            }
            set
            {
                Calc.Result = value;
                RaisePropertyChanged();
            }
        }
    }
}
まとめ
以前、マイクロソフトが主催するWPF関連のセミナーを受講した時に次の様な事を言われてました。
- MVVMは学習コストがそれなりに必要なので、プロジェクトの状況(期間、予算、MVVM習熟度)に応じて従来(イベント)方式とMVVMのどちらを採用するか決めれば良い。
- 1つのプロジェクトで従来方式とMVVMを混在するのは、メンテナンス性に欠けるので避けてください。
MVVMは分業の必要があるような大人数・大規模開発で初めて効力を発揮するため、小規模少人数での開発だと無駄が多くなります。
DIYプログラミングにおいてはデメリットの方が大きいというのがお分かりいただけたかと思います。


コメント