自作アプリケーションにおいて、画面や文字の色や背景色を、利用者が変更できるようにしたい場合があります。
今回はWindowsで用意されている標準の色(カラー)をすべて取得し、コンボボックスやリストボックスでフォントを選択する方法を解説したいと思います。
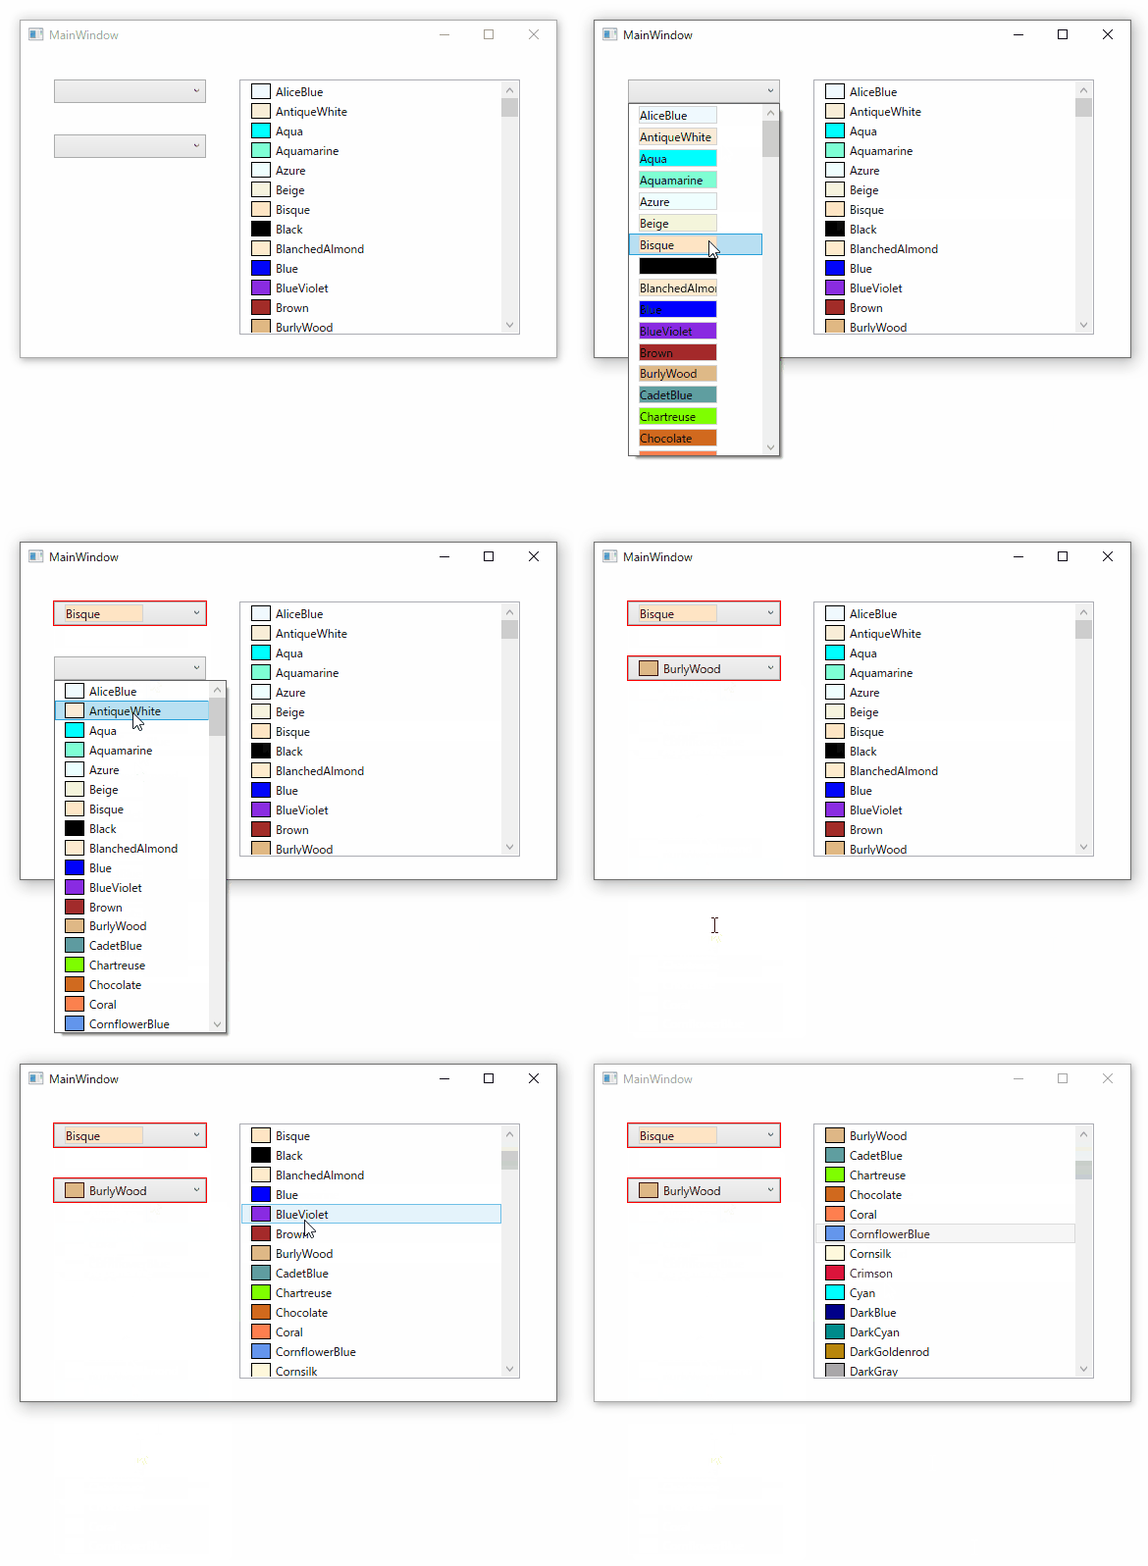
今回紹介する画面の動作
サンプルプログラムはWPFで作成していますが、カラー取得部分はWindowsFormと共通です。
WindowsFormの場合、コンボボックスやリストボックスの項目ごとに色を変えたり、色と文字を重ねて表示することは結構面倒なのですが、WPFであればXAMLで簡単に実現できます。
C#のソースコード
コンボボックス、リストボックスのどちらにせよ、C#側のソースコードは同じです。
クラスの型(Type)に対して GetPropertiesメソッドを呼び出すと、そのクラスの持つPublicプロパティを取得することができます。
これを使って Color クラスが持つプロパティ(この場合は色の名前)をすべて取得しています。
具体的には、次のようになります。
var colors = typeof(Colors).GetProperties(BindingFlags.Public | BindingFlags.Static)フォント一覧は FontsクラスのSystemFontFamiliesコレクションを参照することで取得可能ですが、このままでは日本語フォント名が正しく表示されません。
そこで、カレント言語(OSの言語)のフォント名を取得し、日本語フォント名が見つかった場合は、それを使うようにしています。
画面には実際の色と対応する色名を表示したいので、MyColorというクラスを作成し、色情報はColorメソッドに、色名はNameメソッドにセットし、それぞれのプロパティをXAMLでBindingしています。
using System;
using System.Collections.Generic;
using System.Linq;
using System.Text;
using System.Threading.Tasks;
using System.Windows;
using System.Windows.Controls;
using System.Windows.Data;
using System.Windows.Documents;
using System.Windows.Input;
using System.Windows.Media;
using System.Windows.Media.Imaging;
using System.Windows.Navigation;
using System.Windows.Shapes;
using System.Reflection;


namespace ColorPickerTest
{
    /// <summary>
    /// MainWindow.xaml の相互作用ロジック
    /// </summary>
    public partial class MainWindow : Window
    {
        public MainWindow()
        {
            InitializeComponent();

            DataContext = GetColorList();
        }

        /// <summary>
        /// すべての色を取得するメソッド
        /// </summary>
        /// <returns></returns>
        private MyColor[] GetColorList()
        {
            return typeof(Colors).GetProperties(BindingFlags.Public | BindingFlags.Static)
                .Select(i => new MyColor() { Color = (Color)i.GetValue(null), Name = i.Name }).ToArray();
        }

    }

    /// <summary>
    /// 色と色名を保持するクラス
    /// </summary>
    public class MyColor
    {
        public Color Color { get; set; }
        public string Name { get; set; }
    }
}
このサンプルプログラムでは、色情報と色名を格納したMyColorクラスの配列をDataContextに渡していますが、代わりにコンボボックスまたはリストボックスのDataContextに直接セットしてもOKです。
その場合はコントロールに名前を付ける必要がありますので、例えば コンボボックスに uxColorSelect という名前を付けた場合、次のように記述します。
uxColorSelect.DataContext = GetColorList();また、冒頭の参照設定には以下の1行が必要になります。
using System.Reflection;XAML(コンボボックス上に色と色名を重ねて表示)
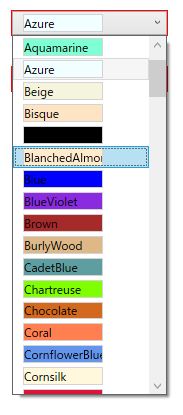
コンボボックスのドロップダウンリストに、色と色名を重ねて表示し、選択できるようにしたパターンです。
文字色が黒なので、背景色が濃くなると読めなくなりますが、実用上あまり問題はないかと思います。
<Window x:Class="ColorPickerTest.MainWindow"
        xmlns="http://schemas.microsoft.com/winfx/2006/xaml/presentation"
        xmlns:x="http://schemas.microsoft.com/winfx/2006/xaml"
        xmlns:d="http://schemas.microsoft.com/expression/blend/2008"
        xmlns:mc="http://schemas.openxmlformats.org/markup-compatibility/2006"
        xmlns:local="clr-namespace:ColorPickerTest"
        mc:Ignorable="d"
        Title="MainWindow" Height="352.471" Width="562.168">
    <Grid>
        <ComboBox ItemsSource="{Binding}"  SelectedValue="{Binding Color}"  Margin="34,30,0,0" Height="24" VerticalAlignment="Top" VerticalContentAlignment="Center" HorizontalAlignment="Left" Width="155">
            <ComboBox.ItemTemplate>
                <DataTemplate>
                    <Border Width="80" Height="Auto" Margin="5,0" BorderThickness="1" BorderBrush="LightGray" >
                        <Border.Background>
                            <SolidColorBrush Color="{Binding Color}"/>
                        </Border.Background>
                        <TextBlock Text="{Binding Name}"></TextBlock>
                    </Border>
                </DataTemplate>
            </ComboBox.ItemTemplate>
        </ComboBox>
    </Grid>
</Window>
XAML(コンボボックス上に色と色名を並べて表示)
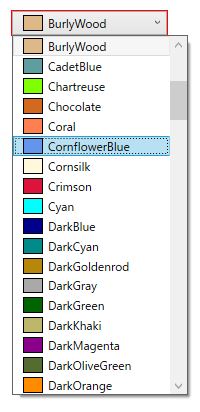
コンボボックスのドロップダウンリストに、色と色名を並べて表示し、選択できるようにしたパターンです。
個人的にはこちらの方が見栄えが良いかと思います。
<Window x:Class="ColorPickerTest.MainWindow"
        xmlns="http://schemas.microsoft.com/winfx/2006/xaml/presentation"
        xmlns:x="http://schemas.microsoft.com/winfx/2006/xaml"
        xmlns:d="http://schemas.microsoft.com/expression/blend/2008"
        xmlns:mc="http://schemas.openxmlformats.org/markup-compatibility/2006"
        xmlns:local="clr-namespace:ColorPickerTest"
        mc:Ignorable="d"
        Title="MainWindow" Height="352.471" Width="562.168">
    <Grid>
        <ComboBox ItemsSource="{Binding}" SelectedValue="{Binding Color}" Margin="34,86,0,0" Height="24" VerticalAlignment="Top" VerticalContentAlignment="Center" HorizontalAlignment="Left" Width="155">
            <ComboBox.ItemTemplate>
                <DataTemplate>
                    <StackPanel Orientation="Horizontal">
                        <Border Width="20" Height="Auto" Margin="5,0" BorderThickness="1" BorderBrush="Black"  >
                            <Border.Background>
                                <SolidColorBrush Color="{Binding Color}"/>
                            </Border.Background>
                        </Border>
                        <TextBlock Text="{Binding Name}"></TextBlock>
                    </StackPanel>
                </DataTemplate>
            </ComboBox.ItemTemplate>
        </ComboBox>
    </Grid>
</Window>
XAML(リストボックス)
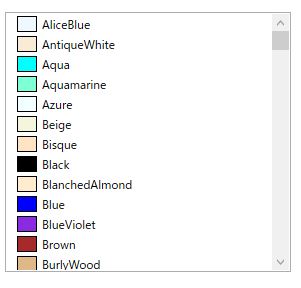
リストボックスでフォントを選択する場合は次のようになります。
表示するエリアがあれば、こちらの方が選びやすいのではないかと思います。
Window x:Class="FontSelectTest.MainWindow"
        xmlns="http://schemas.microsoft.com/winfx/2006/xaml/presentation"
        xmlns:x="http://schemas.microsoft.com/winfx/2006/xaml"
        xmlns:d="http://schemas.microsoft.com/expression/blend/2008"
        xmlns:mc="http://schemas.openxmlformats.org/markup-compatibility/2006"
        xmlns:local="clr-namespace:FontSelectTest"
        mc:Ignorable="d"
        Title="MainWindow" Height="290.164" Width="572.541">
    <Grid>
        <ListBox Width="200" Height="203" Margin="327,28,0,0" HorizontalAlignment="Left" ItemsSource="{Binding}" VerticalAlignment="Top">
            <ListBox.ItemTemplate>
                <DataTemplate>
                    <TextBlock Text="{Binding LocalFontName}" FontFamily="{Binding FontFamily}"/>
                </DataTemplate>
            </ListBox.ItemTemplate>
        </ListBox>
    </Grid>
</Window>
選択したカラーの取得方法
いずれの場合も、SelectedItem に 選択されたMyColor のオブジェクトが格納されています。SelectionChangedのイベントハンドラに渡される sender をキャストしてコントロールを取り出せば、SelectedIndexにアクセスできます。
下記は、ComboBox の SelectedItem から MyColor を取り出すサンプルです。
private void ComboBox_SelectionChanged(object sender, SelectionChangedEventArgs e)
{
     var mycolor = (MyColor)((ComboBox)sender).SelectedItem;
     var color = mycolor.Color;
     var name = mycolor.Name;
}
まとめ
今回はWindowsで利用可能な色名の一覧の取得と、コンボボックス、及びリストボックスを使って色を選択する方法について解説しました。
色の一覧は Color クラスに対して GetPropertiesメソッドを呼び出すことで取得可能です。
あとは、XAML上でコンボボックスに表示したり、リストボックスに表示したりと、好きなデザインで選択できるようになります。
EXCELやPowerPointの色選択のようにRGB単位で細かく調整することはできませんが、ちょっとした色の選択をしたい時には便利に使えるのではないかと思います。
今回紹介した方法以外にも様々な方法があると思いますが、その中の1つの方法として活用していただければと思います。




コメント