自作のプログラムで何らかの機能を作る場合、すでに近い機能を持つDOSコマンドが存在していたら、それを利用するのが一番簡単です。
そこで、C#からDOSコマンド(=コンソールアプリケーション)を起動して、その結果を取得する関数を作りましたので、もしよければご活用下さい。
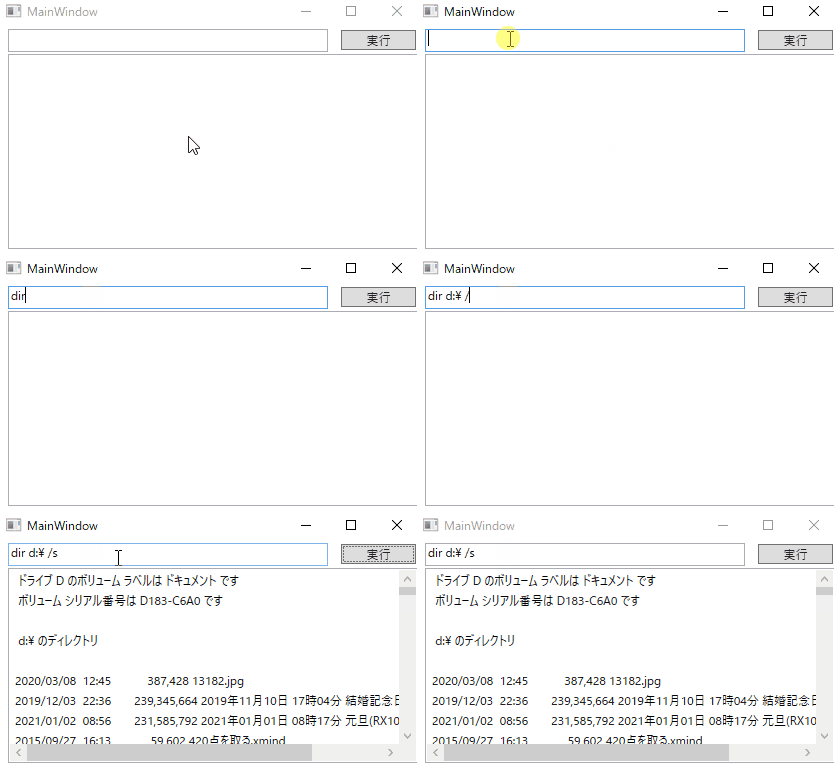
サンプルプログラムの画面
コマンドを入力し、「実行」ボタンをクリックすると結果を表示するサンプルプログラムを作成しました。
この画面で使っているのが、今回紹介する関数です。

関数のソースコード
今回紹介する関数のソースコードは次の通りです。
この関数をコピペして使う場合は、次の2行をソースコードの先頭に追加しておいてください。
using System.Diagnostics;
using System.Windows.Threading;
ちなみに、冒頭で紹介したサンプルプログラムはWPFで作成していますが、この関数自身はWindowsFormとWPFのどちらでも使えます。
/// <summary>
/// DOSコマンドを実行し結果を受取る関数
/// </summary>
/// <param name="command"></param>
/// <returns></returns>
public IEnumerable<string> RunCommand(string command)
{
    ProcessStartInfo psInfo = new ProcessStartInfo();
    psInfo.FileName = "cmd"; // 実行するファイル
    psInfo.Arguments = "/c " + command;//引数
    psInfo.CreateNoWindow = true; // コンソール・ウィンドウを開かない
    psInfo.UseShellExecute = false; // シェル機能を使用しない
    psInfo.RedirectStandardOutput = true; // 標準出力をリダイレクト

    Process p = Process.Start(psInfo); // アプリの実行開始

    string line;

    while ((line = p.StandardOutput.ReadLine()) != null)
    {
        yield return line;
    }
}
関数の使い方
使い方はシンプルで、引数にDOSコマンド(=コンソールアプリケーション)を渡すだけです。
結果は IEnumerable<string> として帰ってきますので、末尾にToArray()を付けるか、ループ処理で取り出して下さい。
//処理が終わるまで待って、結果を配列で取り出す場合
string[] lines = RunCommand("dir d:\ /s");

//ループで少しづつ結果を取り出したい場合
foreach(var line in RunCommand("dir d:\ /s"))
{
    ~処理~
}
ループで取り出してテキストボックスやリストボックスなどのコントロールに随時追加していく場合、この処理に引きずられて画面が更新されません。
この場合、DoEvents() をループの中に記述して下さい。
foreach(var line in RunCommand("dir d:\ /s"))
{
    uxResult.Items.Add(line);
    DoEvents();
}
WPFの場合はDoEvents() がありませんが、下記のDoEvents関数を使えば同じ結果が得られます。
public void DoEvents()
{
    DispatcherFrame frame = new DispatcherFrame();
    Dispatcher.CurrentDispatcher.BeginInvoke(DispatcherPriority.Background,
        new DispatcherOperationCallback(f=> { ((DispatcherFrame)f).Continue = false;return null;}), frame);
    Dispatcher.PushFrame(frame);
}
サンプルのソースコード
それでは、サンプルのソースコードを紹介しておきます。
まずはXAML側のソースコードです。
<Window x:Class="ProcessTest.MainWindow"
        xmlns="http://schemas.microsoft.com/winfx/2006/xaml/presentation"
        xmlns:x="http://schemas.microsoft.com/winfx/2006/xaml"
        xmlns:d="http://schemas.microsoft.com/expression/blend/2008"
        xmlns:mc="http://schemas.openxmlformats.org/markup-compatibility/2006"
        xmlns:local="clr-namespace:ProcessTest"
        mc:Ignorable="d"
        Title="MainWindow" Height="271" Width="438">
    <Grid>
        <Button Content="実行" HorizontalAlignment="Left" Margin="343,3,0,0" VerticalAlignment="Top" Width="75" RenderTransformOrigin="-2.573,-0.4" Click="Button_Click"/>
        <ListBox x:Name="uxResult" HorizontalAlignment="Left" Margin="10,27,0,10" Width="410"/>
        <TextBox x:Name="uxCommand" HorizontalAlignment="Left" Height="23" Margin="10,2,0,0" TextWrapping="Wrap" VerticalAlignment="Top" Width="320"/>
    </Grid>
</Window>
次はC#側のソースコードです。uxCommand テキストボックスに入力された内容を RunCommand関数に渡して、結果をループで取り出し、uxResult リストボックスに随時追加しています。
ループの中でリストボックスに登録しているため、このままだと画面がフリーズしたようになってしまいます。
この対応として、自作の DoEvent() をループの中で呼び出しています。
もしWindowFormで使う場合は、標準のDoEvent() を使ってください。
using System;
using System.Collections.Generic;
using System.Linq;
using System.Text;
using System.Threading.Tasks;
using System.Windows;
using System.Windows.Controls;
using System.Windows.Data;
using System.Windows.Documents;
using System.Windows.Input;
using System.Windows.Media;
using System.Windows.Media.Imaging;
using System.Windows.Navigation;
using System.Windows.Shapes;

using System.Diagnostics;
using System.Windows.Threading;


namespace ProcessTest
{
    /// <summary>
    /// MainWindow.xaml の相互作用ロジック
    /// </summary>
    public partial class MainWindow : Window
    {
        public MainWindow()
        {
            InitializeComponent();
        }

        /// <summary>
        /// メイン処理
        /// </summary>
        /// <param name="sender"></param>
        /// <param name="e"></param>
        private void Button_Click(object sender, RoutedEventArgs e)
        {
            uxResult.Items.Clear();

            foreach(var line in RunCommand(uxCommand.Text))
            {
                uxResult.Items.Add(line);
                DoEvents();
            }
        }

        /// <summary>
        /// DOSコマンドを実行し結果を受取る関数
        /// </summary>
        /// <param name="command"></param>
        /// <returns></returns>
        public IEnumerable<string> RunCommand(string command)
        {
            ProcessStartInfo psInfo = new ProcessStartInfo();
            psInfo.FileName = "cmd"; // 実行するファイル
            psInfo.Arguments = "/c " + command;//引数
            psInfo.CreateNoWindow = true; // コンソール・ウィンドウを開かない
            psInfo.UseShellExecute = false; // シェル機能を使用しない
            psInfo.RedirectStandardOutput = true; // 標準出力をリダイレクト

            Process p = Process.Start(psInfo); // アプリの実行開始

            string line;

            while ((line = p.StandardOutput.ReadLine()) != null)
            {
                yield return line;
            }
        }

        /// <summary>
        /// メッセージ キューに現在ある Windows メッセージをすべて処理する。
        /// </summary>
        public void DoEvents()
        {
            DispatcherFrame frame = new DispatcherFrame();
            Dispatcher.CurrentDispatcher.BeginInvoke(DispatcherPriority.Background,
                new DispatcherOperationCallback(f=> { ((DispatcherFrame)f).Continue = false;return null;}), frame);
            Dispatcher.PushFrame(frame);
        }

    }
}
まとめ
今回は、C#プログラムからDOSコマンド(=コンソールアプリケーション)を呼び出すための関数の紹介と、それを使ったサンプルプログラムについて、簡単な解説とソースコードを公開致しました。
皆様のプログラム開発の参考になれば幸いです。


コメント